


136
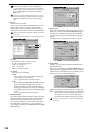
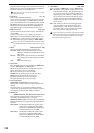
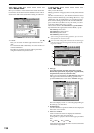
4a. Song Type
[44.1 kHz/16 bit, 48 kHz/16 bit, 44.1 kHz/24 bit,
48 kHz/24 bit, 96 kHz/24 bit]
Specify the sampling frequency and bit depth for the
newly created song.
The type you select will determine the minimum of
tracks that can be simultaneously recorded, played, or
punch-recorded.
Maximum number of simultaneous tracks by Song
Type
You can change the “Song Type” (sampling frequency/bit
depth) only when creating a new song.
It is not possible to continuously record for more than 12 hours
(more than 6 hours at 96 kHz).
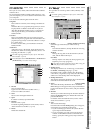
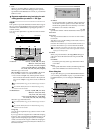
5. Rename
This lets you edit the song name that is highlighted in the
song select window. Press the button to display the
Rename dialog box, and edit the song name. You can
input a name of up to sixteen characters. (→p.97)
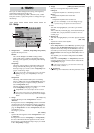
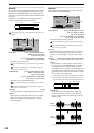
9-2. Edit Song
You can use these operations to edit the current song.
1. Song cell
Information about the current song is displayed here.
The display shows the drive name, song number: song
name, sampling frequency, bit depth, protect setting, and
date of last modification.
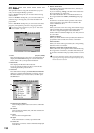
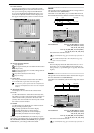
2. Copy
This operation copies the current song to another song
number in the drive you specify.
When you press this button, the Copy Song dialog box
will appear.
Press the Yes button to execute the copy, or press the No
button to cancel. When the copy operation is finished and
the display indicates “Completed,” press the OK button.
This Copy operation cannot be undone.
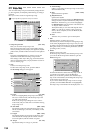
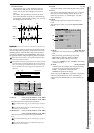
2a. Copy-destination song number cell
This shows the copy-destination drive, and lets you
select the song number. You can select a number in the
range of “001” through “existing song numbers + 1”.
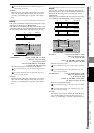
When you execute the copy, the song will be copied to
the copy-destination song number. If the copy-desti-
nation is an existing song number, it will not be over-
written; that song and subsequent songs will be
renumbered upward by one as shown in the diagram
below.
2b. Copy-destination drive
If you want to copy the song to a song drive other than
the current drive, press this button to open the Select
Drive dialog box. Select the desired drive and press
the OK button.
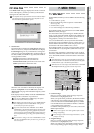
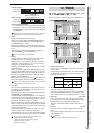
3. Move
This operation moves the selected song to another song
number of the drive you specify.
When you press this button, the Move Song dialog box
will appear. Press the Yes button to execute the move, or
press the No button to cancel. When the move operation
is finished and the display indicates “Completed,” press
the OK button.
This Move operation cannot be undone.
3a. Move-destination song number cell
This shows the current drive, and lets you select the
song number.
If you are moving a song within the current drive, you
can choose from the existing song numbers. If you are
moving a song between different song drives, you can
select a number in the range of “001” through “exist-
ing song numbers + 1”.
When you execute the move, no data will be overwrit-
ten. If the move-destination number you selected is
higher than the move-source number, preceding song
numbers will be renumbered forward. If the move-
destination number is lower than the move-source
number, subsequent song numbers will be renum-
bered down by one.
Song Type Recording Playback Punch recording
44.1 kHz/16-bit
16 32 [*16] 8
48 kHz/16-bit
44.1 kHz/24-bit
816 4
48 kHz/24-bit
96 kHz/24-bit 4 8 2
4a
2
3
4
5
1
6
2a
2b
Before copying
ABC
CDR
3 4
1
AAA ZZZ
2
Song number
Song name
After copying
Song number
Song name
Copy to song number “3”
ABC CDR
4 5
1
AAA ZZZ
2
3
AAA
Moved backward
3a
3b