


181
Appendices
TroubleshootingVarious messages
More about drives
and files
Installing the
options
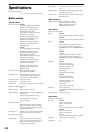
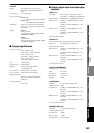
Specifications
Various listsGlossaryIndex
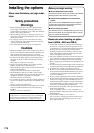
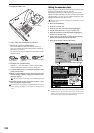
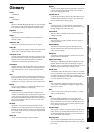
Checking after installation
When you turn on the D32XD/D16XD, the currently-in-
stalled option boards will be shown in the LCD screen.
After installing an option board, be sure to turn on the power
and verify that the icon for the option board you installed ap-
pears in the LCD screen when you turn on the power.
If the icon does not appear, you may have installed the board
incorrectly. Immediately turn off the power, and check that
you installed the board correctly.
If the calendar battery is not installed correctly, or if it has run
low, the LCD screen will display a message of “Battery volt-
age for Calender is low.” when you turn on the power and
the D32XD/D16XD has started up. Once again make sure
that you are using a battery that has not run down, and that
the battery is installed correctly.
If you have questions about installation, contact your Korg
distributor.
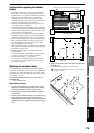
Checking the internal CD-R/RW drive
When shipped from the factory, a removable CD-R/RW
drive is installed in the D32XD/D16XD. When moving or
transporting the D32XD/D16XD, you should be careful to
avoid subjecting it to vibration or impact.
If the CD-R/RW drive icon fails to appear after the D32XD/
D16XD has been moved or transported, or if error messages
appear frequently, use the following procedure to check that
the CD-R/RW drive is installed correctly.
Before performing this procedure, you must turn off the power of
the D32XD/D16XD and disconnect the power cable.
1. You will need a Philips (+) screwdriver and a stack of
magazines or similar objects.
2. Turn off the power of the D32XD/D16XD, and discon-
nect all cables from it.
3. As described in the preceding section “Replacing the
calendar battery,” lay the D32XD/D16XD on its face
with stacks of magazines etc. supporting its four cor-
ners so that the knobs and keys are not damaged.
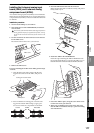
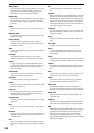
4. From the bottom of the D32XD/D16XD, remove the sin-
gle screw that fastens the internal CD-R/RW drive.
5. Slide the removal switch in the direction of the arrow,
and the CD-R/RW drive will be pushed out of the
D32XD/D16XD.
If you are simply checking that the drive is installed, it is suf-
ficient for the drive to be pushed out by this distance. You do
not need to pull the drive out any farther.
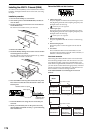
6. Push the CD-R/RW drive in until the front panel of the
drive is aligned with the front panel of the D32XD/D16XD.
Press the location indicated by the arrow until you hear a
click, so that the internal connector is firmly connected.
7. Fasten the screw that you removed in step 4.
AIB-8 icon
ACB-8 icon
(For Input 9–16)
DIB-8 icon
Analog
compressor icon
(For Input 1–8)
CD-R/RW
drive icon
CD-R/RW drive
Installing the
options