


77
Operation
Song,
Locate
MixerEffects
RhythmRecorder
CDDataDriveUSBMIDIUpgrading
the system
Touch Panel
Calibration
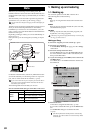
Creating a fade-out
Fading-out the IN–OUT region of track 1
(1) Specify the region that you want to fade-out.
Set the following locations to specify the region where
the fade-out will occur (→p.69).
• Set the IN point to specify the beginning of the region
where the fade-out will occur.
• Set the OUT point to specify the end of the region
where the fade-out will occur.
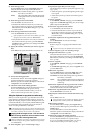
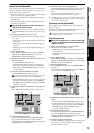
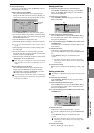
(2) Select “FadeTrk.”
In the TRACK, “EditTrk” tab page, press the Edit Trk
Type cell. In the Edit Trk Type dialog box, choose “Fade-
Trk ” and press the OK button.
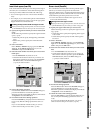
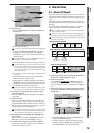
(3) Select the fade-out curve.
Press the Mode button to display the Fade Mode dialog
box.
A.B.C: Fade-in curve
D.E.F: Fade-out curve
For details on how these curves differ, refer to “Fade-
Trk” (→p.145).
For this example, select the type “D” curve and press the
OK button to return to the “EditTrk” tab page.
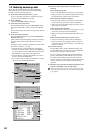
(4) Select the track number that you want to fade-out.
• For the Destination cell, select track “1”.
• Check the IN and OUT locations. If you want to set
the locations with more precision, press the Destina-
tion Wave button, and use the Wave dialog box
(→p.139) to set the location.
(5) Execute the editing operation.
Press the Exec. button. Then in the FadeTrk dialog box,
press the Yes button to execute the operation.
When the operation is finished, the display will indicate
“Completed.” Press the OK button.
(6) Check the results of the editing operation.
Press the LOC1/IN key, and play back from the IN loca-
tion to verify that the operation has done correctly.
If you are not satisfied with the results, you can use
Undo to return to the previous state. (→p.147)
This editing operation will take a longer time for execution (until
the Completed indication appears) in proportion to the length of
the IN–OUT region you specify.
Boosting the maximum volume to the specified
level (Normalize: NormalizeTrk)
If the recorded level of a track is lower than necessary, you
can use this operation to boost the overall level of the speci-
fied region (IN–OUT) so that its maximum volume reaches
the specified level.
•You can normalize one track or simultaneously normalize
the data of adjacent tracks.
If you boost data that was recorded at an extremely low level, any
noise in that region will also be boosted.
Normalizing the IN–OUT region of track 1
(1) Specify the region that you want to normalize.
Set the following locations to specify the region for nor-
malize (→p.69).
• Set the IN point to specify the beginning of the region
to be normalized.
• Set the OUT point to specify the end of the region to
be normalized.
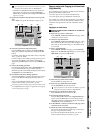
(2) Select “NormalizeTrk.”
In the TRACK, “EditTrk” tab page, press the Edit Trk
Type cell. In the Edit Trk Type dialog box, choose “Nor-
malizeTrk” and press the OK button.
(3) Specify the maximum level.
Press the Mode button to display the Normalize Mode
dialog box. Set the “Normalize Gain Level” value, and
press the OK button.
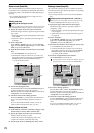
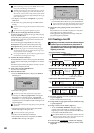
(4) Select the track number that you want to normalize.
• For the Destination cell, select track “1”.
• Check the IN and OUT locations. If you want to set
the locations with more precision, press the Destina-
tion Wave button, and use the Wave dialog box
(→p.139) to set the location.
(5) Execute the editing operation.
Press the Exec. button. Then in the NormalizeTrk dialog
box, press the Yes button to execute the operation.
When the operation is finished, the display will indicate
“Completed.” Press the OK button.
(6) Check the results of the editing operation.
Press the LOC1/IN key, and play back from the IN loca-
tion to verify that the data was normalize correctly.
If you are not satisfied with the results, you can use
Undo to return to the previous state. (→p.147)
This editing operation will take a longer time for execution (until
the Completed indication appears) in proportion to the length of
the IN–OUT region you specify.
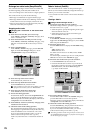
(5)
(2) (3)
(4)
Recorder