


64
Tap tempo
You can record the tempo track by pressing (tapping) the
PLAY key at the beginning of each measure or on each beat
while the song plays.
You can use a PS-1 foot switch (sold separately) instead of the
PLAY key (→p.126).
Tap tempo lets you record the tempo track after a song has
already been recorded. If you record the tempo for a song for
which you did not originally specify the tempo, you will be
able to do the following things.
• Edit tracks in units of measures
• Connect and synchronize external MIDI devices
(1) Specify the time signature of the song.
If the time signature changes during the song, create a
tempo map at the location where the time signature
changes.
Tempo settings will play back in synchronization, but meas-
ures will become incorrectly aligned if the time signature
changes do not match.
(2) If you want to use a foot switch to input the tap tempo,
connect an optional PS-1 foot switch to the FOOT
SWITCH jack of the D32XD/D16XD.
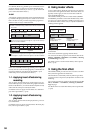
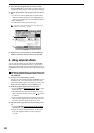
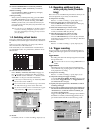
(3) Specify how you want to record the tempo.
Access the TEMPO, “TempoTrk” tab page, and choose
“MeasTap” (tap at the beginning of each measure) or
“BeatTap” (tap on each beat).
(4) Record the tap tempo track.
•Press the RecStart button to put the D32XD/D16XD in
record-ready mode. Tap tempo will be recorded from
the beginning of the song.
• When you press the PLAY key or a connected foot
switch, the song will begin playing, and tap tempo
recording will also begin.
• While you listen to the playback, record the tap tempo
by pressing the PLAY key or foot switch at the inter-
vals you specified in step (4). The counter will be dis-
played while you record the tap tempo.
When using the PLAY key to record tap tempo, do not strike
the key any more forcefully than necessary. Doing so may
damage the hard disk etc.
(5) After you have input the last tap, press the STOP key.
For example if you are inputting four measures of a 4/4
time signature, tap four times in the case of “MeasTap”
or sixteen times in the case of “BeatTap” to input up to
the beginning of the fifth measure. Then press the STOP
key.
If you input taps only until mid-way through the song,
the tempo of the last-input measure or beat will be auto-
matically copied to the end of the song.
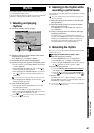
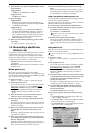
(6) Check the tempo source.
When you record the tempo track, the TEMPO, “SetUp”
tab page Tempo Source will automatically be set to
“TempoTrk.”
Move to the beginning of the song, press the PLAY key
to play back, and check the tempo.
The D32XD/D16XD has 32 [*16] channel tracks for each
song. For each channel track, there are eight virtual tracks; A
through H.
The D32XD/D16XD provides a separate master track for
each song, and this master also has eight virtual tracks; A
through H.
This is a two-channel track that is used for recording the final
stereo mix of your song. If you want to create an audio CD,
the data on the master track will be used.
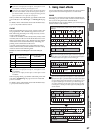
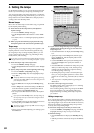
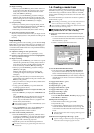
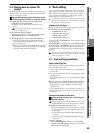
The following table shows the number of available tracks
and the number of tracks that can be used simultaneously.
Number of simultaneously usable tracks for each Song
Type
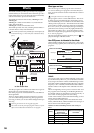
1. Recording
The D32XD/D16XD’s recorder can record analog or digital
audio input sources assigned to mixer channels. Several
types of recording are provided, as described below.
You can also mix your song down to a two-track stereo mix,
and record it on the master track.
1-1. Basic recording
Here’s how to record the audio signal that you specified in
“1. Inputting audio to the mixer” (→p.42).
If you want to create a new song for recording, set refer to “1-1.
Creating a new song” (→p.36).
(1) Create a new song (→p.36 “1-1. Creating a new song”).
(2) Adjust the mixer settings (→p.42 “1. Inputting audio to
the mixer”).
(3) Apply effects to the audio input (→p.56 “Effects”).
(4) Apply EQ to the audio input (→p.48 “Applying EQ to
an audio input”).
(5) Adjust the pan (→p.48 “3-2. Adjusting the pan”).
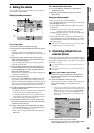
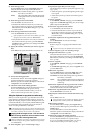
(6) Check the recording mode.
Access the REC/PLAY MODE, “Rec/Play” tab page, and
set Rec Mode to “Normal.”
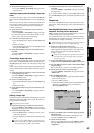
(7) Set the recording level.
You can set the recording level in one of two ways.
•You can record at the optimum level simply by record-
ing at the level you specified in steps (1) through (4).
Press the REC button to set it to “PRE” in the CH
VIEW, “Ch View” tab page.
• If you want to further adjust the channel fader and
record at the adjusted level, set the REC button to
“PST” in the CH VIEW, “Ch View” tab page.
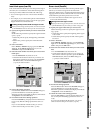
With the PRE setting, the channel fader will send the input
signal to the master bus, setting the monitor level. With the
PST setting, the send level to the master bus will be the same
as the recording level.
You can also make this setting in the MIXER, EQ/PHASE/
REC [*SEND (EFF/AUX/REC)], “Rec Send” tab page.
(8) Move to the location where you want to start record-
ing. (→p.38)
Song Type Recording Playback Punch recording
44.1 kHz/16-bit
16 32 [*16] 8
48 kHz/16-bit
44.1 kHz/24-bit
816 4
48 kHz/24-bit
96 kHz/24-bit 4 8 2
Recorder