


180
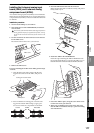
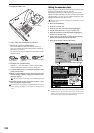
5. Remove the HDD cover.
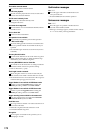
6. Notice where the calendar battery is located.
7. Remove the worn-out calendar battery.
Press on the battery at the location shown below to
remove it from the tab of the battery holder, and lift up
the battery to remove it.
Be careful not to drop the battery into the interior of the
D32XD/D16XD.
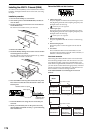
8. Install the new calendar battery.
With the “+” side of the battery upward, insert it diago-
nally into the battery holder and press it into place.
9. Close the HDD cover by reversing the procedure with
which you opened it.
10.When you have finished, turn on the power and verify
that the message “Battery voltage for Calender is low.”
no longer appears.
You must perform this checking step immediately after step 9.
11.Reset the calendar to the correct time and date. (→next
item “Setting the calendar clock”)
If excessive force was applied to the hard disk harness or connector
while replacing the battery, a drive-related error message will ap-
pear.
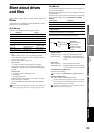
Setting the calendar clock
When a song is saved, the file is time-stamped with the date
and time provided by the internal calendar.
Perform the following procedure before you first use the
D32XD/D16XD for the first time, after you have replaced the
calendar battery (→p.179), or if you need to change the calen-
dar date and time for any other reason.
When the D32XD/D16XD is shipped, the calendar time will not
have been set.
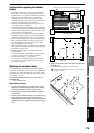
1. Press the SYSTEM key.
2. Press the “Control” tab.
3. Press the year area of the Date field to highlight it.
4. Use the value dial or the +/– keys to set the year.
5. Press the month area of the Date field to highlight it,
and set it in the same way.
6. In the same way, set the day, hour (in 24-hour format),
minute, and second areas of the Date field.
7. Press the Set button to finalize the setting.
The internal calendar will continue operating even if the D32XD/
D16XD’s power is off. This means that once you set the internal
calendar, you will not need to set it again except in special circum-
stances, such as after replacing the calendar battery.
Calendar battery
Press this area
of the battery
Release the catch
and lift up
Insert a new battery
4
5
6
1
7
6
2
3 4
5
6