


86
(6) Execute the import.
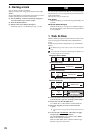
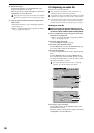
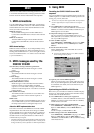
Press the Exec. button to open the Import dialog box,
and press the Yes button to execute.
When the operation is finished, the display will indicate
“Completed.” Press the OK button.
The length of time required for this operation to be completed
will increase in proportion to the size of the file being import-
ed.
(7) Copy the imported audio file from the clipboard into
tracks 1 and 2.
• Store the TO location (→p.38 “Assigning locations to
the Locate keys”).
• Refer to “Using the clipboard to copy data to another
song” (→p.70), steps (9)–(14).
2-2. Exporting an audio file
Here’s how to export an audio file.
When exporting to CD-R/RW, use either a blank disc or an
ISO9660 format disc that has not been finalized.
An audio file exported to CD-R/RW can be loaded by the D32XD/
D16XD or by a computer even if the disc has not been finalized.
A file exported to the PC drive can then be saved on your compu-
ter. To do so, first save the file on the PC drive of the D32XD/
D16XD’s hard disk, and then save that file onto your computer.
Exporting an audio file
Copying the audio data from the master track of a 96
kHz/24-bit song to the clipboard, and exporting it to the
PC drive as a stereo audio file named “D16XD_ST.WAV”
(1) Select a 96 kHz/24-bit song, and copy the master track
audio data to the clipboard.
• Refer to “Using the clipboard to copy data to another
song” (→p.70), steps (1)–(6).
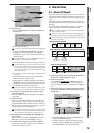
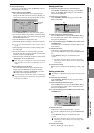
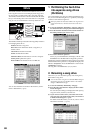
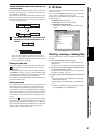
(2) Select the Export command.
Access the TRACK, “Export” tab page.
(3) Select the export-destination drive.
Press the Drive button to open the Select Drive dialog
box. Choose “PC” and press the Yes button.
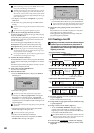
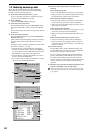
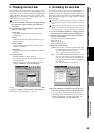
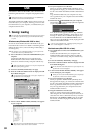
(4) Rename the audio file.
A name of NONAMEST.WAV will be assigned automat-
ically.
Press the Rename button to open the Rename dialog
box, and change the name to D16XD_ST.WAV (→p.36).
For details on the file names you can use, refer to “More
about drives and files” (→p.173).
If the export-destination already contains an identically-
named file, you will not be able to export the file.
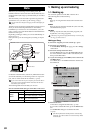
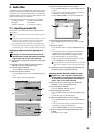
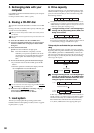
(5) Execute the export command.
Press the Exec. button. In the Export dialog box, press
the Yes button to execute.
When the operation is finished, the display will indicate
“Completed.” Press the OK button.
(4)
(5)
(3)
(2)
(4)
(3)
(3)