


133
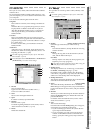
Reference
Counter
Rename
METER
CH
VIEW
MIXEREFFECTCDSYSTEMMIDI/
SYNC
TEMPOSONGTRACKUNDO
STORESCENEMARK
SCRUB
LOC1/IN
...LOC6
ENTERMARK
JUMP
REC/PLAY
MODE
Transport
keys
Here you can make settings for the tempo, time signature,
and rhythm (metronome) of the song.
If the counter is displaying “MBT” (measure, beat, 1/96th
beat), the counter (→p.96) will operate according to the spec-
ified tempo.
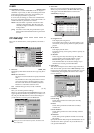
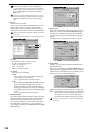
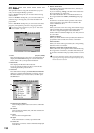
8-1. SetUp
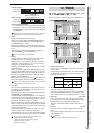
1. TempoSource [Manual, TempoMap, TempoTrack]
Specifies the tempo source.
Manual
The current “Tempo” and “Beat” settings will be
used. It will not be possible to automatically change
the tempo, time signature, and rhythm pattern during
the song.
TempoMap
The tempo, time signature, and rhythm pattern will
change automatically during the song, according to
the tempo maps you create. Use the “TempoMap” tab
page to create tempo maps.
If you want to add or edit tempo map events in the “Tem-
poMap” tab page, select “TempoMap” as the tempo
source.
TempoTrack
The tempo will be determined by the recorded tap
tempo or MIDI clock. Use the “TempoTrack” tab page
to record tap tempo or sequencer tempo, and then
select “TempoTrack” here.
The time signature will follow the settings you created
in the “TempoMap” tab page. (→p.135)
“TempoTrack” can be selected after the data is created.
If you create a tempo track in the “TempoTrack” tab page,
the tempo source will automatically be switched to “Tempo
Track.”
2. Tempo [40…240, (***)]
Specifies the tempo when “TempoSource” is set to
“Manual.”
If TempoSource is set to “TempoMap,” this area will indi-
cate the tempo for the current time location as specified
by the tempo maps you created in the “TempoMap” tab
page. If “TempoSource” is set to “TempoTrack,” this area
will indicate “***.”
The range is =40–240.
3. Beat [1/4…16/16)]
Specifies the time signature when “TempoSource” is set
to “Manual.”
If TempoSource is set to “TempoMap” or “TempoTrack,”
this area will indicate the time signature for the current
time location as specified by the tempo maps you created
in the “TempoMap” tab page.
4. Assign [CH Input, Master, Monitor]
Here you can assign the output of the rhythm.
CH Input:
Outputs the rhythm as a channel input source.
Master:
Outputs the rhythm to the master bus.
Monitor:
Outputs the rhythm to the monitor bus.
If you select “CH Input,” use the “Ch Assign” tab page
(→p.100) to assign the rhythm to the desired channel.
5. Prev
Turn this on (highlighted) if you want to preview the
rhythm.
This is valid only in this tab page; it will automatically be
switched off if you play back the recorder or move to
another page.
6. Rhythm On
Turn this on (highlighted) if you want to play the rhythm.
7. Vol [000…100]
Adjusts the volume of the rhythm.
8. Rhythm Pattern
When TempoSource is set to “Manual,” press the popup
button to open the Rhythm Pattern dialog box, select a
rhythm from the list, and press the OK button. You can
also make your selection by selecting (highlighted) the
Rhythm Pattern cell and using the value dial (or the +/–
keys).
The rhythms you can select will depend on the “Beat”
(→p.185).
In the case of “TempoMap” or “TempoTrack,” this will
show the rhythm for the current location created in the
“TempoMap” tab page.
In the case of a 96 kHz song, you will be able to select only
Metro, Hihat, and Blank.
9. buttons
Use these up/down buttons to edit the parameter values.
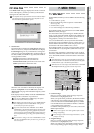
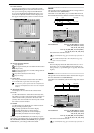
8. TEMPO
1
3
4
5
2
6
8
9
7
TEMPO
MIDI/
SYNC