


19
Quick Start
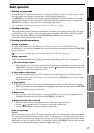
Step 1: PreparationsStep 2: Quick recordingStep 3: OverdubbingStep 4: Mixdown and
mastering
Quick Start
This Quick Start is designed to provide a few examples of some common tasks,
while helping you get familiar with the operations of the D32XD/D16XD.
Step 1: Preparations
The first step explains how to connect your monitor speakers or headphones,
how to turn the D32XD/D16XD on, and how to listen to the demo songs.
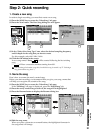
Step 2: Quick recording
This step will cover how to connect a guitar, keyboard, or mic to the D32XD/
D16XD, how to record your performance on to a track, and how to play back
the recording and listen to the results.
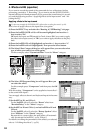
Step 3: Overdubbing
Overdubbing allows you to record additional tracks as you play along with
the performance you recorded in step 2.
Step 4: Mixdown and mastering
In this step you can apply effects and EQ to each track to adjust the overall
balance.
Finally, you can apply effects and EQ to the entire song to add overall com-
pression and tonal adjustments, and mix your song down to the stereo master
track.
Step 1: Preparations
1. Connections
Please note the following items before you begin.
The D32XD/D16XD automatically stores the date and time each time a song is
saved, so that you can tell when a song was updated. Before you begin, we rec-
ommend that you set the date and time (→p.180 “Setting the calendar clock”).
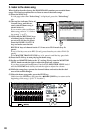
The D32XD/D16XD was designed to make use of Korg’s
TouchView graphical interface for quick and intuitive oper-
ation.
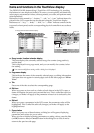
If you have any questions about how to use the TouchView
display, refer to “Items and functions in the TouchView dis-
play” (→p.15).
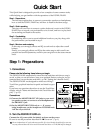
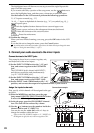
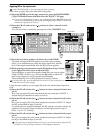
Connections
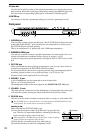
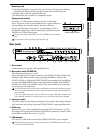
(1)Connect the MONITOR OUT L/R jacks to your moni-
tor speaker system, or connect a set of headphones to
the PHONES 1 jack.
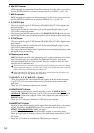
(2)Set the MONITOR LEVEL knob to –∞. If you are
using headphones, set the headphone VOLUME knob
1 all the way to the left.
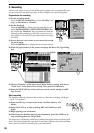
2. Turn the D32XD/D16XD on
Connect the AC power cable (included), and turn on the power.
Be sure to use the procedure described in “● Power-on” (→p.1).
Use an independent AC outlet whenever possible. If a circuit breaker should trip for some rea-
son, any unsaved data will be lost and the internal hard drive or CD-R/RW may be damaged.
(1)
(2)
Monitor speaker etc.
Headphones
(2)(1)
Step 1: Preparations