


104
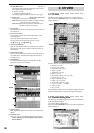
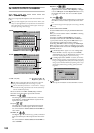
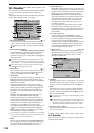
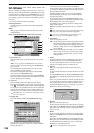
3c-2. Automation
You can turn automation on and record the realtime changes
you make to the mixer settings while the song plays or
records.
The recorded automation can then automatically change the
mixer settings during playback or recording.
1. Record channel buttons [ , s]
Use these buttons to select the channels for which you
want to record automation. Events will be recorded for
each channel whose button you press to make it indicate
(Rec) .
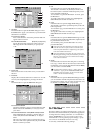
2. Record parameter buttons
[Fader, Pan, CH ON, Send, Expression]
Use these buttons to select the parameter for which you
want to record automation. You can select only one
parameter at a time; press a radio button to highlight the
desired parameter.
If you select Send, automation will be recorded for sends whose
Send key (INTERNAL 1/2, AUX 1/2/3/4) is lit when recording
begins. However, “6. Snap Shot” will record all Send parameters.
If you select Expression, press the button located at the side to
select (Rec) before you start recording.
3. Master Fader [ , s]
If you selected “Fader” as the record parameter, and you
want to record the operations of the MASTER fader as
well, press this button to make it indicate “ ”.
4. Automation
This button turns automation playback/recording on/off.
OFF: Automation playback/recording will not occur.
On (Play): Executes automation playback. The Automa-
tion indicator will light.
During song playback or recording, when the song
reaches the location at which an event is recorded, that
setting will be recalled, automatically changing the set-
tings of the mixer. The fader will automatically move
when this occurs. New automation events will not be
recorded.
ON (Rec): Executes automation playback and event
recording. The Automation indicator will light.
During song playback or recording, when the song
reaches the location at which an event is recorded, that
setting will be recalled, automatically changing the set-
tings of the mixer. The fader will automatically move
when this occurs. In addition, new events will be
recorded for channels whose record channel button is set
to (Rec), according to the settings of the Event Rec
Mode dialog box. When the recorder stops, this setting
will automatically change to ON (Play).
If automation is on and you have not stored any scene, the Default
Scene will automatically be selected. If you want to edit scene-re-
lated parameters, be sure to store the scene.
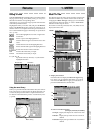
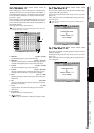
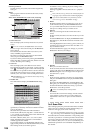
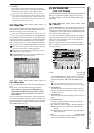
5. Mode
When you press this button, the Event Rec Mode dialog
box will appear, allowing you to select the automation
recording method. Press the OK button to apply your
selection, or press the Cancel button to cancel it.
5a. Recording mode
Overwrite: Automation data will be overwritten from
the point you begin playing/recording the song until
the point where you stop. If you do not record events,
all the previously-recorded events will be erased.
Punch Write: Parameters you adjust between the In
Time (the location where you begin recording events)
and Out Time (the location where you stop) will be
recorded. Previously-recorded events will remain
unchanged in the areas where you do not record
parameter operations.
If you select Fader as the parameter to be recorded,
fader data will be overwritten only while you are
operating the faders (i.e., from when you touch a fader
knob until you release it), regardless of the In Time
and Out Time.
5b. In Time, Out Time
If the recording mode is “Punch Write” and you
selected a parameter other than Fader as the parame-
ter to be recorded, these settings specify the locations
at which event recording will begin and end.
Use the LOC5 key to register the In Time (the location
at which event recording will begin), and the LOC6
key to register the Out Time (the location at which
event recording will end). (→p.38)
5c. Release Time [0 ms...5 s]
When the recording method is “Punch Write,” this
specifies the time from when you take your finger off
the fader until the level returns to the level of the
already-recorded events.
6. SnapShot
Pressing this button when “4. Automation” is on and the
recorder is stopped will record a “snapshot” of events for
channels whose record channel button is set to (Rec).
7. Undo
Press this if you want to revert the recorded automation
to its prior state. You can revert to the state prior to the
previous operation. If the button indicates Redo, you can
use it to cancel the Undo.
You can use “3c-3. Event List” to make detailed changes to the
recorded events.
This data is held in common with the “8. Undo” data of “3c-3.
Event List.” If you press the Event List’s Undo button imme-
diately after recording automation, not the most recent event
edit but the previously-recorded automation will be erased.
8. Free event memory amount
This indicates the amount of remaining memory in which
you can record events.
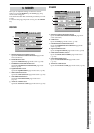
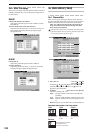
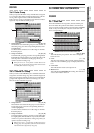
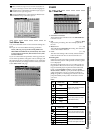
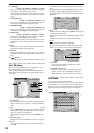
3c-3. Event List
Here you can view or edit the events and scenes that you re-
corded using automation.
1
4
5
2
6
7
8
3
5a
5c
5b