


70
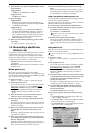
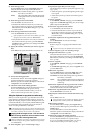
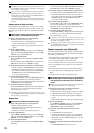
(3) Select the copy mode.
Press the Mode button. In the Copy Mode dialog box,
select the desired mode and press the OK button.
(4) Select the copy-source track number.
• For the Source cell, select track “1”.
• Check the IN and OUT locations. If you want to set
the locations with more precision, press the Source
Wave button, and use the Wave dialog box (→p.139)
to set the location.
(5) Select the copy-destination track number.
• For the Destination cell, select track “2”.
If you specified two or more tracks as the “Source,” you must
specify the same number of tracks in “Destination.”
•Verify that the TO location is correct. If you want to set
the location with more precision, press the Destina-
tion Wave button, and make your settings in the Wave
dialog box (→p.139).
(6) Specify the number of time that you want to copy the
data.
In the Times cell, specify the number of copies as “3”.
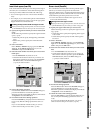
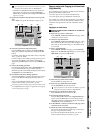
(7) Execute the editing operation.
Press the Exec. button. Then in the CopyTrk dialog box,
press the Yes button to execute the operation.
When the operation is finished, the display will indicate
“Completed.” Press the OK button.
(8) Check the results of the editing operation.
Press the LOC3/TO key, and play back from the TO loca-
tion to verify that the data was copied correctly.
If you are not satisfied with the results, you can use
Undo to return to the previous state. (→p.147)
Using the clipboard to copy data to another song
When you use the clipboard to copy data between tracks of
songs that have a different sampling frequency and/or bit
depth, the sampling frequency and/or bit depth will be con-
verted automatically. You can specify whether dithering will
be performed to make quantization noise less obtrusive
when converting 24-bit data to 16-bit data.
If the sampling frequency of the song copied to the clipboard is dif-
ferent from that of the copy-destination song, a certain amount of
time will be required for the conversion to be performed.
Copying the IN–OUT region of track 1 once from the 48
kHz/24-bit song number 001 to the TO location of track
2 of the 44.1 kHz/16-bit song number 002
Before you make these copy settings, verify that the correct virtual
tracks are selected for the copy-source (Source) and copy-destina-
tion (Destination).
(1) Select song 001 (→p.37 “1-3. Selecting a song”).
(2) Specify the region that you want to copy.
Set the following locations to specify the region for copy-
ing (→p.69).
• Set the IN point to specify the beginning of the region
to be copied
• Set the OUT point to specify the end of the region to
be copied
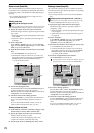
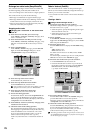
(3) Select “CopyTrk.”
In the TRACK, “EditTrk” tab page, press the Edit Trk
Type cell. In the Edit Trk Type dialog box, choose “Cop-
yTrk” and press the OK button.
(4) Select the copy-source track number.
• For the Source cell, select track “1”.
• Check the IN and OUT locations. If you want to set
the locations with more precision, press the Source
Wave button, and use the Wave dialog box (→p.139)
to set the location.
(5) Select the clipboard as the copy-destination track
number.
For the Destination cell, select track “Clip.”
(6) Execute the copy.
Refer to step (7) of “Copying tracks within the same
song.”
Any data currently in the clipboard will be overwritten.
(7) Select song 002 (→p.37 “1-3. Selecting a song”).
(8) Register the TO location. (→p.69)
Verify that the TO location is correct. If you want to set
the location with more precision, press the Destination
Wave button, and make your settings in the Wave dialog
box (→p.139).
(9) Select “CopyTrk.”
In the TRACK, “EditTrk” tab page, press the Edit Trk
Type cell.
In the Edit Trk Type dialog box, choose “CopyTrk” and
press the OK button.
(10)Select the copy mode.
Press the Mode button. In the Copy Mode dialog box,
select the desired mode and press the OK button.
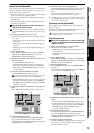
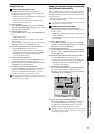
(11)Select the clipboard as the copy-source track number.
For the Source cell, select track “Clip1.” The number
indicates the number of tracks in the clipboard.
(12)Select the copy-destination track number.
Set the Destination cell to track “2”.
(13)Specify the number of times that the data will be cop-
ied.
Set the Times cell to “1”.
If you specified two or more tracks as the “Source,” you must
specify the same number of tracks as the “Destination.”
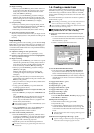
(14)Execute the operation.
Press the Exec. button to display the CopyTrk dialog
box. If you want dithering to be performed, turn on the
Dither button.
Press the Yes button to execute the operation.
When the operation is finished, the display will indicate
“Completed.” Press the OK button.
(15)Check the results of the editing operation.
Press the LOC3/TO key, and play back from the TO loca-
tion to verify that the data was copied correctly.
If you are not satisfied with the results, you can use
Undo to return to the previous state. (→p.147)
OverWrite: The track data existing at the copy-destina-
tion will be overwritten.
Insert: The copied data will be inserted; subsequent
existing data will be moved toward the end
of the song.
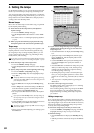
(5)
(7)
(2) (3)(4)
(6)
OverWrite: The track data existing at the copy-destina-
tion will be overwritten.
Insert: The copied data will be inserted; subsequent
existing data will be moved toward the end
of the song.