


80
If the selected song is 24-bit, press the Dither button to turn
it on if you want dithering to be performed.
The data will be written to CD as a 44.1 kHz song. If you se-
lect a song whose sampling rate is other than 44.1 kHz, the
data must be converted, and a certain amount of time will be
required for the conversion to be performed before the song ap-
pears in the track list.
• The display will indicate “Completed,” so press the
OK button.
• In the same way, specify the songs for TR02 and fol-
lowing.
You cannot select a song for which a master track has not been
created.
You cannot select songs from a different song drive.
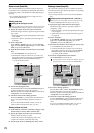
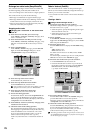
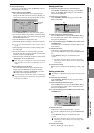
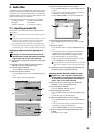
(4) Specify the size of the gaps between each track.
Press the Gap button, specify the pre-gap and post-gap,
and press the OK button.
Use the Sec cell to specify the gap in terms of seconds, or
the Frm cell to specify the gap in terms of frames (one
second = 75 frames).
You can set the gaps independently for each song.
PreGapTime: The period of silence before the song.
PostGapTime: The period of silence after the song.
By default, the pre-gap is two seconds, and the post-gap is
zero seconds. However, the pre-gap for the first song is zero
seconds, and this cannot be changed.
For a song that fades-out, you can reduce the gaps to avoid a
unwanted sense of waiting between songs.
(5) Audition the Album CD Project.
Press the ® button in the screen to play back the album
project. Listen to it through your headphones or monitor
system.
The album project will be played back exactly as it will
sound when written to the CD.
(6) Insert a disc into the CD-R/RW drive.
You must use a blank disc.
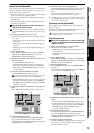
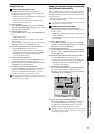
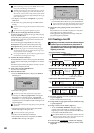
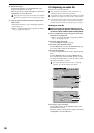
(7) Write the album to disc.
•Press the WriteToCD button to display the Write To
CD dialog box.
• Select the writing speed.
You must use a disc that supports this writing speed.
•A message of “Obey Copyright Rules” will appear.
Read the owner’s manual section “COPYRIGHT
WARNING” (→p.iii), and press the Yes button if you
accept the terms. The D32XD/D16XD will begin creat-
ing an image file.
You can abort creation of the image file by pressing the Can-
cel button.
• When the image file has been created, the D32XD/
D16XD will begin writing it to disc.
You cannot abort this writing operation.
• The disc will automatically be finalized.
• When finalization has been completed, the “Write
Another CD?” message will appear.
• If you want to create another disc with the same data,
press the Yes button. Otherwise, press the No button.
If you create another disc with the same data, the process will
take less time since the image file has already been created.
(8) Check the CD by playing it back on an audio CD
player.
Play back the CD on an audio CD player to verify that
your audio CD was created correctly.
During playback, the gaps between songs will be dis-
played as negative track times.
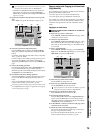
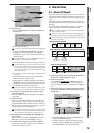
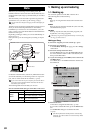
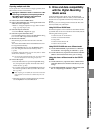
2-2. Creating a live CD
Assigning a track index to each of the individual songs re-
corded as part of one continuous live performance on
song A (figure A), to create a live CD in which there are no
gaps between tracks, and the song or dialog starts at the
beginning of each track
(1) Select the song that you want to make into a live CD
(→p.37). [Figure A]
Create a master track for this song.
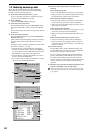
(2) Assign marks at appropriate locations within the song
(→p.39). [Figure B]
(3) Assign “Use As CD Tr” marks. [Figure C]
• Access the MARK, “EditMark” tab page, assign a
mark at each location that you want to use as the
beginning of a track, and press the Use As CD Tr but-
ton to add a “Use As CD Tr” mark.
The “Use As CD Tr” mark will always be added to mark 001,
and this cannot be deleted. (The track at mark 001 can be de-
leted from the Album CD Project, if desired.)
(4) Access the CD, CD WRITER, “Album CD” tab page.
(5) In the track list, select the song that you want to write
[Figure D].
Song you already created
Mark
1
Mark
2
Mark
3
Mark
4
Mark
5
Mark
6
Mark
7
Mark
8
Mark
9
Mark
1#
Mark
2#
Mark
3#
Mark
4#
Mark
7#
Mark
8#
Mark
9#
Assign marks
Load into the Album CD Project track list
TR01
First
song
Second
song
Third song MC1
Fourth
song
Introduction
MC2
First
song
Second
song
Third song
Third song
MC1
Fourth
song
Introduction
MC2
First
song
Second
song
Third song
First
song
Second
song
MC1
MC1
Fourth
song
Fourth
song
Introduction
MC2
Delete unwanted tracks (TR01, TR06), and write the song
Register Use As CD Tr (register marks with #)
TR02 TR03 TR04 TR05 TR06 TR07
TR01
TR02
TR03
TR04
TR05
Song A (Live)
Song A (Live)
Song A (Live)
#: Mark with “Use As CD Tr”
Figure
A
Figure
B
Figure
C
Figure
D
Figure
E
Master track already created