


177
Appendices
TroubleshootingVarious messages
More about drives
and files
Installing the
options
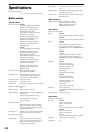
Specifications
Various listsGlossaryIndex
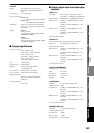
Installing the 8-channel analog input
board (AIB-8) and 8-channel analog
compressor board (ACB-8)
An 8-channel analog input board (AIB-8) can be installed to
add analog input channels INPUT 9–16. An 8-channel analog
compressor board (ACB-8) can also be installed for INPUT 9–
16 channels.
Installation procedure
1. You will need a Philips (+) screwdriver.
2. Turn off the power of the D32XD/D16XD, and discon-
nect all cables.
The interior of the D32XD/D16XD reaches high temperatures
during operation. Before you perform this operation, turn off
the power and wait at least 30 minutes for the interior to cool
down.
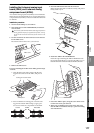
3. Use the screwdriver to remove the four screws that fas-
ten the AIB-8 cover.
Be careful not to lose the screws you removed.
4. Remove the AIB-8 cover.
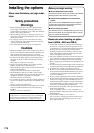
If you are installing the ACB-8 on the AIB-8, perform steps
‘a’ and ‘b’.
a. Align the three holes of the ACB-8 with the lock-
ing pins and connector of the AIB-8, and press it
in.
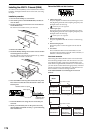
b. Press in until the two locking pins A and one lock-
ing pin B are locked. When doing so, apply pres-
sure to areas where no components are mounted.
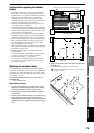
5. Insert the AIB-8’s flat cable into the connector.
Make sure that the cable is oriented correctly, and push it
firmly all the way in.
6. Install the AIB-8 in the D32XD/D16XD.
Insert the edge containing the AIB-8’s TRIM knobs into
the opening that had been covered by the AIB-8 cover, so
that the flat cable is folded inside the D32XD/D16XD.
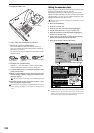
7. Fasten the AIB-8 in place, using the screw driver to fas-
ten the four screws you removed.
8. When you are finished, turn on the power and verify
that the AIB-8 is installed correctly. (→p.181 “Checking
after installation”)
AIB-8 cover
Pin A
Pin A
Pin B
Locking pin insertion holes
AIB-8 panel
Connector
ACB-8
Locked Not locked
AIB-8
Pin A Pin B Pin A Pin B
Protrusions
Tab
Installing the
options