


66
(5) Press the REC key to put the D32XD/D16XD in record-
ready condition.
Trigger/RecStart
The REC key and PLAY key will blink.
Trigger/Punch In
The REC key will blink.
(6) Begin recording.
Trigger/RecStart
When the input signal exceeds the threshold level,
recording and playback will start automatically (REC
and PLAY keys will light).
Trigger/Punch In
Press the PLAY key to start playback (the REC key
will blink, and the PLAY key will light). At the loca-
tion that you want to record, begin performing on
your instrument. When the input signal exceeds the
threshold level, recording will start automatically
(REC and PLAY keys will light).
(7) When you have finished performing, press the STOP
key to stop.
(“1-1. Basic recording” (→p.64), step (10))
1-5. Re-recording a specific area
(Punch-in/out)
If you made a mistake in a recorded performance, or are not
satisfied with a portion of the performance, you can use
“punch-in/out” recording to fix just that portion without
having to record the entire part over again. Punch-in/out re-
cording can be done manually or automatically
Punch-in: Switches from the playback mode to the
record mode.
Punch-out: Switches from the record mode back to the
playback mode.
Manual punch-in/out
Here’s how to punch-in and punch-out manually.
During playback, press the REC key or an optional PS-1 foot
switch to begin recording, and then press the REC key, PLAY
key, or foot switch to stop recording.
(1) Prepare to record.
Refer to “1-1. Basic recording” (→p.64), steps (1)–(8).
(2) Adjust the playback level.
If you want to hear the recorded sound before and after
the punch-in/out region, access the MIXER, SOLO/
MONITOR, “Monitor” tab page, and turn “Cue” on.
Then go to the “CueLevel” tab page, and adjust the
“LEVEL” of the track that you want to re-record
(→p.51).
(3) Move the location to a point earlier than the point
where you want to start recording. (→p.38)
(4) Press the PLAY key to begin playback (the PLAY key
will light).
The song will play back, and you will hear the sound of
the playback tracks as well as the sound of the track you
will be re-recording.
(5) When you reach the point that you want to re-record,
press the REC key. (The REC and PLAY keys will
light.)
Recording will begin (manual punch-in), and you can re-
record your performance.
(6) When you reach the point at which you want to stop
re-recording, press the REC key or the PLAY key. (The
REC key will go dark.)
Recording will stop (manual punch-out), and normal
playback will resume. By repeating steps (5) and (6), you
can re-record more than one section in one pass.
(7) Press the STOP key to stop. (The PLAY key will go
dark.)
After you stop recording, move the location to a point
earlier than where you began recording, and play back
to verify that the re-recording is satisfactory.
Using a foot switch for manual punch-in/out
You can switch between playback and recording by pressing
a PS-1 foot switch (sold separately).
This lets you punch-in/out while you perform, or when the
D32XD/D16XD is located at a distance.
(1) Connect a foot switch to the FOOT SWITCH jack.
(2) Access the SYSTEM, “Control” tab page, and specify
the function of the foot switch.
Set “Function” to “PunchIn-Out.”
If you are using the PS-1 foot switch, make sure that “Polar-
ity” is set to “–” (→p.126).
(3) Perform manual punch-in/out recording.
Follow the procedure described in “Manual punch-in/
out.” When doing so, you can press the foot switch at
steps (5) and (6) to switch between punch-in and punch-
out.
Auto punch-in/out
Here’s how to punch-in and punch-out automatically at the
locations you specify beforehand.
You will not be able to execute recording if MIDI SYNC is set to
MTC.
(1) Prepare to record.
Refer to “1-1. Basic recording” (→p.64), steps (1)–(5) and
(7).
(2) Set the playback level.
If you want to hear the recorded sound before and after
the region you are re-recording, access the MIXER,
SOLO/MONITOR
, “Monitor” tab page, and turn
“Cue” on. Then go to the “CueLevel” tab page, and
adjust the “LEVEL” of the track that you want to re-
record (→p.51).
(3) Store the location at which you want to start recording
in the IN (punch-in) locate point, and store the location
at which you want to stop recording in the OUT
(punch-out) locate point.
For details on setting the IN and OUT locations, refer to
“Assigning locations to the Locate keys” (→p.38).
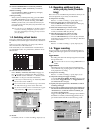
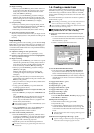
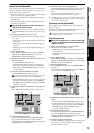
(4) Access the REC/PLAY MODE, “Rec/Play” tab page,
select the Auto Punch button, and turn on the auto
punch-in/out function.
The AUTO PUNCH indicator will light.
(5) Specify the playback region before and after record-
ing.
• Set “Roll Time Unit” to the desired unit: “Sec” (sec-
onds) or “Meas” (measures).
• Set “Pre Roll Time” to specify the length of playback
that will occur before recording begins.
• Set “Post Roll Time” to specify the length of playback
that will occur after recording ends.
(5)
(4)