


8
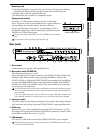
The balanced XLR jacks for INPUT 1–8 provide +48V phantom power for use by condenser
mics; you can switch this on/off independently for each channel.
Your equipment may be damaged if you connect or disconnect a condenser mic with phantom
power turned on. You must turn phantom power off before connecting condenser mics.
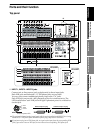
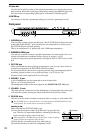
2 MONITOR LEVEL knob
This knob sets the volume level of the signal being sent from the MONITOR
OUT L/R jacks.
3PAD buttons
The pad will reduce the input level by 26 dB. The pad is on when the switch is
pressed in. You can extend the adjustable range of the TRIM knob by turning
the pad on when using a line input.
Leave the pad switched off for a low-output device such as a mic or guitar.
4 TRIM knobs
These knobs adjust the input level. The LED located at the upper right of each
knob will light to indicate the following conditions.
Lit green: an input signal is present
Lit orange: nominal input level
Lit red: input overload
Use the TRIM knob to make adjustments so that this indicator does not light
red when the input level from the connected device reaches its loudest point.
The TRIM knob has a range of +14 to –34 dBu when PAD is on, or –12 to –60
dBu when PAD is off.
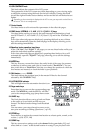
The markings around the knob indicate the input level.
The input level will depend on the instrument or performance, but the
approximate ranges are as follows.
–60 – –40 dBu: mic input
–30 dBu: guitar, bass guitar
–10 dBu: consumer audio devices such as a CD player
+4 dBu: keyboards or studio equipment
If the TRIM knob is raised when nothing is connected to the input, hum or noise may re-
sult. Keep the trim knob at its lowest setting when the channel is not in use.
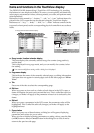
5 CH SELECT keys
Pressing one of these keys will select the track that is currently active in the
“Ch View,” “EQ/ATT,” or the various SEND tab pages. The selected CH
SELECT key will light.
6 CH ON/SOLO keys
The operation of these keys will depend on the mode selected by the “CH
ON/SOLO mode key” (See item 11).
In CH ON mode, these keys enable/disable each channel. They can be used
as a channel mute function. The key will be lit when on (enabled) and dark
when off (disabled).
In SOLO mode, pressing a key will turn the SOLO on/off for that channel.
You may solo more than one channel if desired. In SOLO mode, the selected
keys will blink.
7 REC/PLAY keys
These keys switch each recorder track between the record and playback
modes. Each time you press one of these keys, the track status will change.
Key lit green: PLAY (playback)
Key lit red: REC (record)
If the master track MASTER TRACK STATUS key is set to PLAY, all tracks
will automatically be muted (Key dark).