


88
The D32XD/D16XD’s hard disk is divided into one, two or
four song drives used to record and play back songs, and a
PC drive used to exchange data with a personal computer.
The D32XD/D16XD also has a built-in CD-R/RW drive that
lets you write backup data or the audio data for a completed
song to a CD, or load audio files or backup data from a CD.
The D32XD/D16XD provides the following utility functions
for managing these drives.
Partition: Divide a song drive
Drive Info: View information about a song drive, or
rename a drive
Check Drive: Check the hard disk
Format: Format the hard disk
USB Slave Mode: Transfer data to or from a computer
Load System: Update the system
Erase CDRW: Erase the data from a CD-RW disc
You can also check the size of files in the PC drive, and re-
name or delete them. (→p.91)
1. Partitioning the hard drive
into separate song drives
(Partitions)
You can divide the song drive area of the hard disk into one,
two, or four individual song drives, or partitions, and assign
a name to each of these song drives.
When you partition the hard disk, all data in the song drive area
will be erased. However, the data on the PC drive will not be
erased.
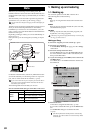
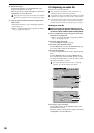
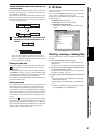
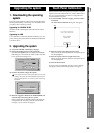
(1) Access the SYSTEM, “DiskUtility” tab page, and press
the Partition button to display the Partition dialog box.
(2) Press the Partition list button and selectthe number of
hard disk partitions you wish to create.
(3) Execute the Partition operation.
When you press the
Yes
button, the display will ask
“Are
You Sure?”
Press the
Yes
button to begin the operation.
Partitioning will erase all data from the song drive area of the
hard disk. When the operation is completed, the display will
indicate “Completed.” Press the OK button to return to the
“DiskUtility” tab page.
The song drives are identified as A, B, C, and D.
2. Renaming a song drive
Here’s how you can check the capacity of each song drive,
and rename a song drive.
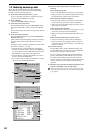
You can also rename a song drive in the Select Drive dialog box
that appears when you press the Drive button in the “Select-
Song” or “Album CD” tab page.
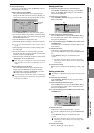
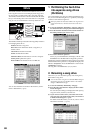
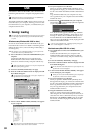
(1) Access the SYSTEM, “DiskUtility” tab page.
(2) Press the Drive Info button to display the Drive Infor-
mation dialog box.
For each drive, the dialog box displays the total capacity,
song drive name, used area, and free area.
(3) If you want to rename a drive, select that drive in the
song drive list, press the Rename button, and rename it
in the Rename dialog box (→p.36).
For details on the file names you can use, refer to “More
about drives and files” (→p.173).
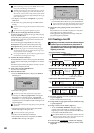
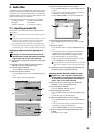
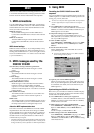
Drive
D32XD/D16XD
PC drive
Drive B
Drive C
Drive D
Drive A
Hard disk
CD-R/RW drive