


36
Operation
Each song drive on the D32XD/D16XD’s internal hard disk
can store up to one hundred songs.
1. Selecting/creating a song
Here’s how to create, rename, or select a song.
1-1. Creating a new song
In order to begin a new recording, you will first need to cre-
ate a new song.
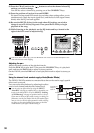
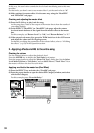
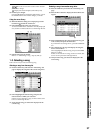
(1) Press the SONG key and select the “SelectSong” tab
page.
The upper part of the tab page shows which song is
selected as the current song.
(2) Press the New button to display the New Song dialog
box.
(3) Use the radio buttons to select the desired combination
of sampling frequency and bit depth for your new
song.
Maximum number of simultaneously usable tracks for
each Song Type
(4) Press the OK button.
The new song will be created following the last existing
song, and will be added to the song list. It will also be
selected as the current song.
The song name will automatically be “Song *”
(“ *” will be a consecutive number starting from
001.).
The sampling frequency, bit depth, and date and time of
last modification (in this case, the date and time of crea-
tion) will be stored, and displayed next to the song
name.
If you want to create a new song on a different song drive,
start by pressing the Drive button to switch song drives.
(→p.37 “Selecting a song from another song drive”).
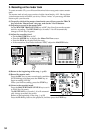
If the Song Type is 48 kHz/24-bit and you record multiple tracks
(four or more tracks) simultaneously, there is a increased possibil-
ity that the state of the hard disk recording area (i.e., fragmenta-
tion) will cause the “Disk too busy.” message to appear. We
recommend that you always execute “OptimizeTrk” (→p.73) af-
ter recording or editing multiple tracks simultaneously in a 48
kHz/24-bit song.
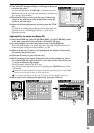
1-2. Renaming a song
When a new song is created, it is automatically assigned a
song number. We recommend that you change the song
name to indicate its content.
Song names can be up to 16 characters in length.
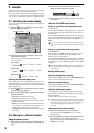
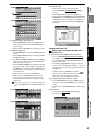
(1) Press the SONG key and select the “SelectSong” tab
page.
(2) From the song list, select (highlight) the song that you
want to rename.
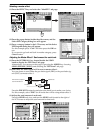
(3) Press the Rename button to display the Rename dialog
box.
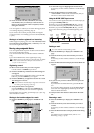
(4) Use the buttons in the screen to edit the song name in
the Rename box.
: Enters a space.
: Erases the entire name.
: Switches between upper and lower case characters.
: Inserts a space, and moves the subsequent char-
acters to the right.
: Deletes the character at the cursor location.
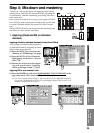
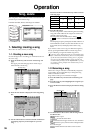
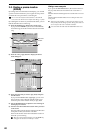
Song, Locate
Hard disk
PC Drive
How the hard disk, drives, and songs are related
Drive: B
Drive: C
Drive: D
Drive: A
Song drive: A
(2)(1)
Current song
(4)
(3)
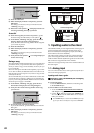
Song Type Recording Playback Punch recording
44.1 kHz/16-bit
16 32 [*16] 8
48 kHz/16-bit
44.1 kHz/24-bit
816 4
48 kHz/24-bit
96 kHz/24-bit 4 8 2
Rename box
(5)