


85
Operation
Song,
Locate
MixerEffects
RhythmRecorder
CDDataDriveUSBMIDIUpgrading
the system
Touch Panel
Calibration
2. Audio files
Audio files saved on CD-ROM/R/RW or the PC drive can be
imported (loaded) into the D32XD/D16XD and pasted into a
song track. Also, any audio track data that you copied to the
D32XD/D16XD’s clipboard can be exported (written) to CD-
R/RW or the PC drive as an audio file.
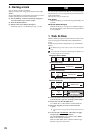
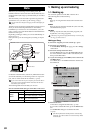
WAV audio files of the following formats are supported.
2-1. Importing an audio file
Here’s how to load an audio file from CD-ROM/R/RW or
the PC drive.
You can use the Undo function to return to the state prior to exe-
cution.
If you want to import an audio file from your computer, connect a
USB cable, copy the audio file to the PC drive of the D32XD/
D16XD, and then perform the procedure described below.
If the sampling frequency and bit depth of the audio file differs
from that of the import-destination song, the data will be convert-
ed automatically. You can choose to perform dithering at this time.
Importing an audio track into the beginning of a
track
Importing a 44.1 kHz/24-bit stereo audio file named
“D16XD_ST.WAV” from CD, and loading it into the begin-
ning of tracks 1 and 2 of a 44.1 kHz/16-bit song
(1) Insert the disc containing the audio file into the CD-R/
RW drive.
(2) Select the song into which you want to import the
audio file. (→p.37 “1-3. Selecting a song”)
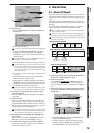
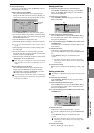
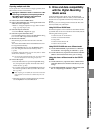
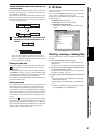
(3) Select the Import command.
Access the TRACK, “Import” tab page.
(4) Select the import-source drive.
•Press the Drive button to open the Select Drive dialog
box.
• Select “CD” and press the Yes button.
(5) Select the audio file that you want to import.
•Press the Select File button to open the Select File dia-
log box.
•You can preview the first few seconds of the selected
audio file by pressing the Prev button.
• Select “D16XD_ST.WAV” and press the OK button.
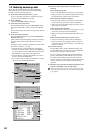
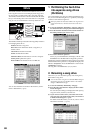
(6) Select the import-destination track number.
In the “Import” tab page, select tracks “1-2” in the Tr k
cell.
(7) Execute the import.
•Press the Exec. button to open the Import File dialog
box.
• Since the import-source audio file has a different bit
depth than the import-destination song, press the
Dither button so that dithering will be performed.
•Press the Yes button to execute the import.
• When the operation is finished, the display will indi-
cate “Completed.” Press the Yes button.
The length of time required for this operation to be completed
will increase in proportion to the size of the file being import-
ed.
(8) Change the location to the beginning of the song, and
verify that the data was imported correctly.
Importing an audio file into the middle of a track
Importing a 44.1 kHz/16-bit stereo audio file named
“D16XD_ST.WAV” from the PC drive, and loading it into
the TO location (the location stored in the LOC3 key) of
tracks 1 and 2 of a 44.1 kHz/16-bit song
(1) Select the song into which you want to import the
audio file. (→p.37 “1-3. Selecting a song”)
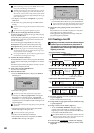
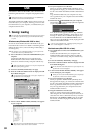
(2) Select the Import command.
Access the TRACK, “Import” tab page.
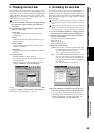
(3) Select the import-source drive.
•Press the Drive button to open the Select Drive dialog
box.
• Select “PC” and press the Yes button.
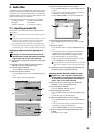
(4) Select the audio file that you want to import.
•Press the Select File button to open the Select File dia-
log box.
•You can preview the first six seconds of the selected
audio file by pressing the Prev button.
• Select “D16XD_ST.WAV” and press the OK button.
(5) Select the clipboard as the import-destination track
number.
In the Tr k cell, select “Clip.”
Sampling frequency: 44.1 kHz, 48 kHz, 96 kHz
Bit depth: 16-bit, 24-bit
Number of channels: 1 (monaural), 2 (stereo)
(4)
(3)
(5)
(6)
(7)
(4)
(4)
(5)
(5)
(5)
Data