


45
Operation
Song,
Locate
MixerEffects
RhythmRecorder
CDDataDriveUSBMIDIUpgrading
the system
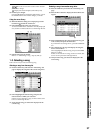
Touch Panel
Calibration
• Set the CH ON/SOLO mode key to CH ON, and turn
the channel 1 and 2 CH ON/SOLO keys on (keys lit).
• Set the channel 1 and 2 REC/PLAY keys to REC (keys
lit red).
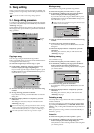
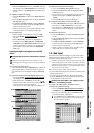
(4) Adjust the input level settings.
•Press the METER key to display the Meter Trk View
screen.
•Press the Meter Trk Type button to display the Meter
Trk Type dialog box.
• In “Select Level Meter Position,” select “CH-Input”
as the level meter mode, and press the OK button to
return to the previous screen.
• When you play back your CD player, the CH 1 and 2
level meters will move in response to the input.
(5) Check the audio.
• Set the channel 1 and 2 faders to unity gain (0 dB).
• Access the MIXER, SOLO/MONITOR
, “Monitor”
tab page.
• Select “Master LR,” and turn it on (highlighted).
• Gradually raise the MASTER fader and PHONES
VOLUME knob or MONITOR LEVEL knob, and ver-
ify that you hear the sound from your headphones or
your monitor system connected to the MONITOR
OUT jacks.
Inputting the digital audio signal from an ADAT
device
Assigning eight sources from an ADAT device to channels
1–8.
The optional ADAT I/O board must be installed (→p.178).
ADAT input cannot be assigned if the current song is 96 kHz/24-
bit.
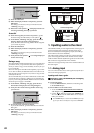
(1) Connect your ADAT device.
Lower the D32XD/D16XD’s MASTER fader, and use an
optical digital cable to connect the ADAT OUT jack of
your ADAT device to the D32XD/D16XD’s ADAT IN
jack.
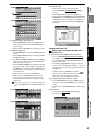
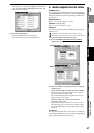
(2) Specify the ADAT input as the digital audio source.
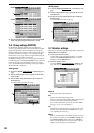
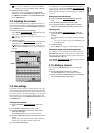
• Access the MIXER, INPUT/OUTPUT/CH ASSIGN
,
“Ch Assign” tab page.
• Select the channel 1 “SOURCE,” and use the
buttons to select “A1.” You can also use the value dial
or the +/– keys to make your selection.
In the same way, select “A2”–“A8” for channels 2–8.
(3) Adjust the synchronization settings.
• Access the SYSTEM, “Word Clock” tab page.
•Press the Clock Source button to display the Clock
Source dialog box.
• If you want to use your ADAT device as the synchro-
nization clock master, set Word Clock Source to
“ADAT.”
•Press the OK button to close the dialog box.
(4) Assign the input audio to mixer channels 1–8.
• Set the CH ON/SOLO mode key to CH ON, and turn
the channel 1–8 CH ON/SOLO keys on (keys lit).
•Press the track 1–8 REC/PLAY keys to set them to REC
(key lit red), and start the Playback on your ADAT
device.
(5) Adjust the input levels.
•Press the METER key to display the Meter Trk View
screen.
•Press the Meter Trk Type button to display the Meter
Trk Type dialog box.
• In “Select Level Meter Position,” select “CH-Input”
as the level meter mode, and press the OK button to
return to the previous screen.
• When you start your ADAT device, the CH1–8 level
meters will move in response to the input.
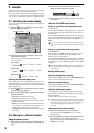
1-3. Sub input
The audio sources from the INPUT 1–8 jacks can be sent to
the sub-mixer and output directly to the master bus, inde-
pendently of being input to the mixer.
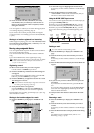
Sub Mixer 1-8 corresponds to INPUT 1-8 jacks respectively. If the
8-channel analog input board is installed, Sub Mixer 9-16 will be
available and will correspond to INPUT 9-16 jacks. If the ADAT
I/O board is installed, Sub Mixer 17-24 will be available and will
correspond to the ADAT INPUT.
Here are some ways in which you can use this:
•You can add external input sources to the recorded sounds
that are playing back.
•You can apply external effects to the audio signal sent
from the AUX OUT jacks, and send the processed signal
via the sub-mixer to the master bus.
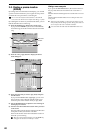
Inputting audio to the INPUT 1 jack, assigning it to sub-
mixer 1, and outputting the audio.
(1) Connect an audio signal to the INPUT 1 jack.
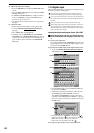
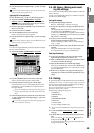
(2) Adjust the sub-mixer settings.
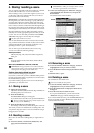
• Access the MIXER, INPUT/OUTPUT/CH ASSIGN
,
“SubMix1–8” tab page.
• Since you are inputting audio to the INPUT 1 jack,
press the Sub Mixer 1 ON button.
The “SubMix9–16” and “SubMix1724” tab pages are avail-
able only if the optional 8-channel analog input board and
ADAT I/O board are installed.
(2)
D16XD
D32XD
(2)
Mixer