


69
Operation
Song,
Locate
MixerEffects
RhythmRecorder
CDDataDriveUSBMIDIUpgrading
the system
Touch Panel
Calibration
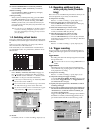
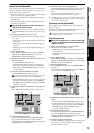
2-3. Playing back an album CD
project
An album CD project lets you arrange songs in a desired or-
der for playback. You can then record the output onto a DAT,
MD, or cassette tape recorder.
Using the Album CD Project function to play back songs in
a specified order and record them on an external recorder
(1) Use the Album CD Project function to specify the
songs that you want to play back.
For details, refer to Album CD Project steps (1)–(4)
(→p.79).
When using Album CD Project, playback will stop if you
move to a different screen.
(2) Connect your external recorder.
Connect your external recorder to the D32XD/D16XD’s
MASTER OUT LR jacks or S/P DIF OUT jack.
(3) Record the output on your external recording device.
•Press the play button to play back the album CD
project, and adjust the recording level on your exter-
nal recording device.
• Return to the beginning of the album CD project, start
recording on your external recording device, and then
press the D32XD/D16XD’s play button.
3. Track editing
You can use track editing commands to copy a track, insert
blank space, erase a track, delete a track, reverse a track, op-
timize a track, exchange tracks, expand/compress a track,
copy an entire track, exchange two entire tracks, create a
fade-in/fade-out, or normalize the level.
In some cases, track editing may not be possible if there is insuffi-
cient space on the song drive. You will need to allocate enough free
space for the track editing operation.
Registering the edit region
Specify the edit region by storing the appropriate points in
the LOC1/IN through LOC4/END keys.
LOC1/IN key: IN point
LOC2/OUT key: OUT point
LOC3/TO key: TO point
LOC4/END key: END point
Use the counter or the FF, REW keys to move to the location
you want to edit.
Press the STORE key, and then press either LOC1/IN, LOC2/
OUT, LOC3/TO, or LOC4/END to store the location in that
key. The location is stored the moment you press the key.
For details, refer to “Assigning locations to the Locate keys”
(→p.38).
If you want to specify a location more precisely while viewing the
waveform, press the Wave button in one of the editing screens, and
use the Wave dialog box (→p.139).
3-1. Track editing procedures
Copy a track (CopyTrk)
This command copies the specified region (IN–OUT) of track
data to another location (TO).
• The IN–OUT region can be copied once, or multiple times
in succession.
•You can copy data from one track, or from multiple tracks
simultaneously.
• By using the clipboard, you can copy track data to a differ-
ent song.
Here are some ways in which you can use this command.
• Repeatedly copy a phrase of several measures (such as a
drum pattern) to create a track that extends the entire
length of song.
• Copy the first verse of a song to create the second verse.
• Record a favorite phrase from a track, and copy it to a dif-
ferent track.
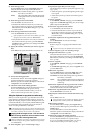
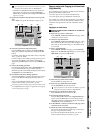
Copying tracks within the same song
Copying the IN–OUT region of track 1 three times to the
TO location of track 2
Select the virtual tracks of the copy-source (
Source
) and copy-destina-
tion (
Destination
) before you make settings for this Copy operation.
(1) Specify the region that you want to copy.
Set the following locations to specify the region for copying.
• Set the IN point to specify the beginning of the region
to be copied
• Set the OUT point to specify the end of the region to
be copied
• Set the TO point to specify the beginning of the copy-
destination
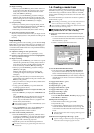
(2) Select “CopyTrk.”
In the TRACK, “EditTrk” tab page, press the Edit Trk
Type cell. In the Edit Trk Type dialog box, choose “Copy
Trk” and press the OK button.
Recorder