


39
Operation
Song,
Locate
MixerEffects
RhythmRecorder
CDDataDriveUSBMIDIUpgrading
the system
Touch Panel
Calibration
(3) Press one of the LOC1/IN, LOC2/OUT, LOC3/TO,
LOC4/END, LOC5, or LOC6 keys to this location to
that key. The registration will be completed, and the
dialog box will close.
You can register a Locate key to a location during playback
or recording simply by performing step (2).
If you want to set a location precisely while viewing the
waveform, refer to “2-3. Finding a precise location (SCRUB)”
(→p.40).
Moving to a location registered to a Locate key
While stopped or playing, press one of the LOC1/IN, LOC2/
OUT, LOC3/TO, LOC4/END, LOC5, or LOC6 keys. You will
move to the registered location.
Moving using assignable Marks
You can register Marks at specific locations and use them to
move to the registered locations.
You can name each mark, to indicate locations within the
song.
Up to one hundred marks can be registered per song.
In addition to their use for finding a registered location, the Marks
are also used to divide tracks when you create an audio CD
(→p.79 “2. Disc At Once”).
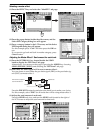
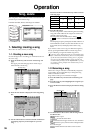
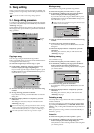
Registering a mark
(1) Move to the location that you want to register.
Use the counter or FF/REW keys to move.
(2) Press the STORE key, and the Stored Time dialog box
will appear.
If you decide not to register the location, press the Exit
button or press the STORE key once again.
(3) Press the MARK key to register the location as a mark.
The dialog box will close.
Mark numbers are automatically re-assigned in numerical or-
der starting at the beginning of the song.
(4) Verify that the mark was registered.
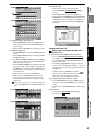
Press the MARK key and select the “EditMark” tab
page, and verify that your new mark was registered.
During playback or recording, perform steps (2) – (4) to reg-
ister a location as a Mark.
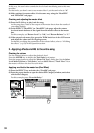
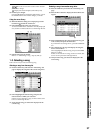
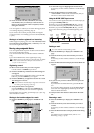
Moving to the location assigned to a mark
(1) Press the MARK key to display the “EditMark” tab
page.
(2) In the mark list, press (highlight) the desired mark.
If necessary, use the scroll bar/buttons to scroll through
the list.
(3) Press the Recall button to recall the mark.
“Current Mark” will show the selected mark, and you
will move to the location of that mark.
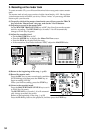
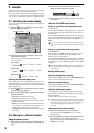
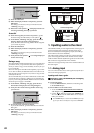
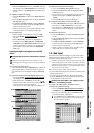
Using the MARK JUMP keys to move
You can move to the registered location of a mark simply by
pressing the MARK JUMP keys.
Each time you press the MARK JUMP (®) key, you will
move to the next mark going toward the end of the song.
Each time you press the MARK JUMP (√) key, you will
move to the next mark going toward the beginning of the
song.
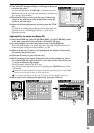
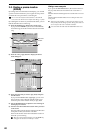
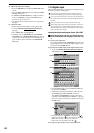
Deleting a mark
You cannot Undo the result of deleting a mark.
(1) Press the MARK key to display the “EditMark” tab
page.
(2) From the mark list, select the mark that you want to
delete.
If necessary, use the scroll bar/buttons to scroll through
the list.
(3) Press the Delete button to display the Delete Mark dia-
log box.
(4) If you are sure you want to delete the mark, press the
Yes button.
If you decide not to delete the mark, press the No but-
ton.
If you want to delete all marks, press the Select All but-
ton to turn it on (highlighted), and then press the Yes
button to delete all marks.
(5) Verify that the mark has been deleted from the mark
list.
Renaming a mark
(1) Press the MARK key to display the “EditMark” tab
page.
(2) From the mark list, select the mark that you want to
rename.
If necessary, use the scroll bar/buttons to scroll through
the list.
(3) Press the Rename button to display the Rename dialog
box.
For details on how to edit the name, refer to “1-2.
Renaming a song” (→p.36).
(3)
(2)
Song
Current
location
Mark005
Mark006
Press
once
Press
once
Press
once
Press
once
Press
once
Mark003
Mark004
Mark007
Order of locations
Song,
Locate