


83
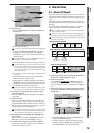
Operation
Song,
Locate
MixerEffects
RhythmRecorder
CDDataDriveUSBMIDIUpgrading
the system
Touch Panel
Calibration
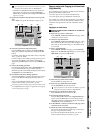
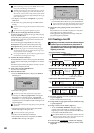
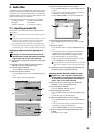
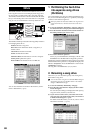
(6) Execute the backup.
When you press the Exec. button, the Backup confirma-
tion dialog box will appear.
When backing up to CD-R/RW
The screen will indicate the space required for the
backup. If the data will not fit on one CD-R/RW, you
will need to prepare the appropriate number of discs.
• Use the WriteSpeed cell to select the writing speed.
• If you want to make it impossible to write any further
data on this CD when you are done backing up, check
the Finalize CD check box.
•Press the Yes button to begin the backup.
• The D32XD/D16XD will begin creating an image file.
You can press the Cancel button to abort creation of the im-
age file.
• When the image file has been created, writing to the
disc will begin.
• If more than one disc is required, a dialog box will
request the next disc when one disc fills up. Insert the
next disc, and press the OK button.
• When the backup is finished, the display will indicate
“Completed.” Press the OK button.
When backing up to CD-R/RW, the written data is automat-
ically compared to ensure that an invalid backup CD is not
created.
When backing up to the PC drive
The screen will indicate the space required for the
backup. Press the Yes button to begin the backup.
When the display indicates “Completed,” press the
OK button. This completes the backup.
You cannot back up to the PC drive if the size of the backup is
larger than the free space on the PC drive. Change the backup-
destination to CD-R/RW.
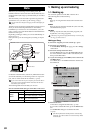
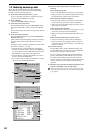
Backing up All Data
(1) Select the song drive that you want to back up.
In the SONG, “SelectSong” tab page, press the Drive
button. In the Select Drive dialog box, select the drive
and press the OK button.
(2) Select the type of backup.
In the SYSTEM, “Backup” tab page, press the “All
Data” radio button.
(3) Select the backup-destination drive.
Press the Drive button to open the Select Drive dialog
box. Press either the “CD” or “PC” radio button, and
then press the Yes button.
(4) If you are backing-up to CD-R/RW, insert a disc in the
CD-R/RW drive.
Use a blank disc or an ISO9660 format disc that has not
been finalized
(5) Edit the file name.
A file name is assigned automatically (→p.174).
If you want to edit the file name, press the Rename but-
ton.
Use the Rename dialog box to edit the file name
(→p.36).
If the backup-destination already contains an identically-
named file, you will be unable to execute the backup. Please
rename the file.
(6) Execute the backup.
Refer to the preceding section “Backing up 1Song,” step
(6).
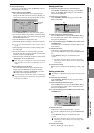
Backing up User Data
The “1Song” or “All Data” backup operations also back up User
Data.
(1) Select the type of backup.
In the SYSTEM, “Backup” tab page, press the “User
Data” radio button.
(2) Select the backup-destination drive.
Press the Drive button to open the Select Drive dialog
box. Press either the “CD” or “PC” radio button, and
then press the Yes button.
(3) If you are backing-up to CD-R/RW, insert a disc in the
CD-R/RW drive.
(4) Edit the file name.
A file name is assigned automatically (→p.174).
If you want to edit the file name, press the Rename but-
ton.
Use the Rename dialog box to edit the file name
(→p.36).
If the backup-destination already contains an identically-
named file, you will be unable to execute the backup. Please
rename the file.
(5) Execute the backup.
Refer to “Backing up 1Song,” step (6).
Required
space
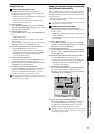
(2)
(1)
Data