


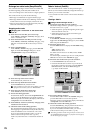


76
Exchange two entire tracks (SwapWholeTrk)
This command exchanges an entire track of recorded data
(from the beginning to the end) with another track.
•You can exchange one or more tracks in a single operation.
This can be used in ways such as the following.
• Rearrange recorded tracks to organize them by type.
• Rearrange data that extends across differing virtual tracks
so that each track uses (for example) virtual track “A.”
• Place two tracks that were recorded separately into adja-
cent tracks so that they can be paired.
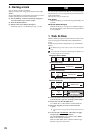
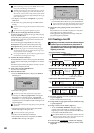
Swapping entire tracks
Swapping track 1 virtual track “A” with track 2 virtual
track “B”
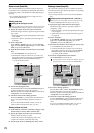
(1) Select the source track that you want to swap.
In the TRACK, “Vtrk1–32 [*Vtrk1–16]” tab page, select
track 1 virtual track “A.”
(2) Select the destination track that you want to swap.
In the TRACK, “Vtrk1–32 [*Vtrk1–16]” tab page, verify
that track 2 virtual track “B” is the track you want to
swap.
(3) Select “SwapWholeTrk.”
In the TRACK, “EditTrk” tab page, press the Edit Trk
Type cell. In the Edit Trk Type dialog box, choose
“SwapWholeTrk” and press the OK button.
(4) Select the swap-source track number.
For the Source cell, select track “1”.
(5) Select the swap-destination track number.
For the Destination cell, select track “2”.
If you specified two or more tracks as the “Source,” you must
specify the same number of tracks in “Destination.”
(6) Select the swap-destination virtual track.
In the Virtual cell, select virtual track “B”.
(7) Execute the editing operation.
Press the Exec. button. Then in the SwapWholeTrk dia-
log box, press the Yes button to execute the operation.
When the operation is finished, the display will indicate
“Completed.” Press the OK button.
(8) In the TRACK, “Vtrk1–32 [*Vtrk1–16]” tab page, select
virtual track “B” for track 2.
(9) Check the results of the editing operation.
Play back from the beginning of the song to verify that
the swapping was performed correctly. In the same way,
check the “Source” track 1 virtual track “A” as well.
If you are not satisfied with the results, you can use
Undo to return to the previous state. (→p.147)
In this case, return the track 1 virtual track selection to
“A.”
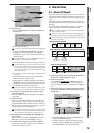
Fade-in/fade-out (FadeTrk)
This command fades-in or fades-out the specified region
(IN–OUT) of recorded track data. By using both of these op-
erations, you can create cross-fades.
•You can fade-in or fade-out one or more tracks simultane-
ously.
Creating a fade-in
Fading-in the IN–OUT region of track 1
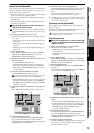
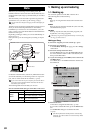
(1) Specify the region that you want to fade-in.
Set the following locations to specify the region where
the fade-in will occur (→p.69).
• Set the IN point to specify the beginning of the region
where the fade-in will occur.
• Set the OUT point to specify the end of the region
where the fade-in will occur.
(2) Select “FadeTrk.”
In the TRACK, “EditTrk” tab page, press the Edit Trk
Type cell. In the Edit Trk Type dialog box, choose “Fade-
Trk ” and press the OK button.
(3) Select the fade-in curve.
Press the Mode button to display the Fade Mode dialog
box.
A.B.C: Fade-in curve
D.E.F: Fade-out curve
For details on how these curves differ, refer to “Fade-
Trk” (→p.145).
For this example, select the type “A” curve and press the
OK button to return to the “EditTrk” tab page.
(4) Select the track number that you want to fade-in.
• For the Destination cell, select track “1”.
• Check the IN and OUT locations. If you want to set
the locations with more precision, press the Destina-
tion Wave button, and use the Wave dialog box
(→p.139) to set the location.
(5) Execute the editing operation.
Press the Exec. button. Then in the FadeTrk dialog box,
press the Yes button to execute the operation.
When the operation is finished, the display will indicate
“Completed.” Press the OK button.
(6) Check the results of the editing operation.
Press the LOC1/IN key, and play back from the IN loca-
tion to verify that the fade-in performs correctly.
If you are not satisfied with the results, you can use
Undo to return to the previous state. (→p.147)
This editing operation will take a longer time for execution (until
the Completed indication appears) in proportion to the length of
the IN–OUT region you specify.
(5)
(7)
(3) (4)
(6)
(5)
(2) (3)
(4)