


65
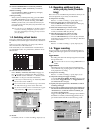
Operation
Song,
Locate
MixerEffects
RhythmRecorder
CDDataDriveUSBMIDIUpgrading
the system
Touch Panel
Calibration
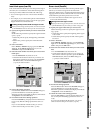
(9) Put the D32XD/D16XD in record-ready condition.
Press the REC key (REC and PLAY keys will blink).
(10)Start recording.
Press the PLAY key (REC and PLAY keys will light).
Perform the part to be recorded.
(11)Stop recording.
When you have finished performing, press the STOP
key (REC and PLAY keys will go dark). Return to the
location at which you started recording, set the REC/
PLAY key of the tracks you recorded to PLAY (key lit
green). Play back, and verify that your performance was
recorded correctly.
The ATT setting in the “EQ/ATT” (or “Ch View”) tab page
is common to recording and playback. If you have turned
down ATT substantially for recording, you may need to ad-
just it for playback.
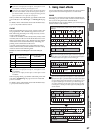
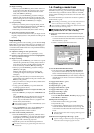
1-2. Switching virtual tracks
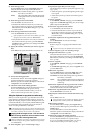
Each song contains up to 32 [*16] tracks and one master track.
In addition, each track has eight “virtual tracks,” labelled A–
H.
When you record or play back, you can specify which of
these virtual tracks A–H will be used.
This means that you can switch between virtual tracks to
record multiple “takes” of a performance, and then choose
the best take.
(1) Select the desired virtual track.
In the TRACK, “Vtrk1–32 [*Vtrk1–16]” tab page, use
the buttons to select the track that you want to
record, and then use the “V-Level” ←→ buttons (or the
value dial or +/– keys) to select the virtual track.
In the case of a 96 kHz/24-bit song, the “Vtrk1–32 [*Vtrk1–
16]” tab will be named “Vtrk1–8.”
For a 44.1 kHz/24-bit or a 48 kHz/24-bit song on the D32XD,
the “Vtrk 1–32” tab page will be named “Vtrk 1–16.”
If a virtual track already contains recorded data, this is graph-
ically indicated by “ ” as shown in the illustration.
(2) Record.
For details, refer to “1-1. Basic recording,” steps (2)–(11).
1-3. Recording additional tracks
while you play back (Overdub-
bing)
Here’s how to record additional performances while you lis-
ten to the playback of previously-recorded tracks.
(1) Prepare for recording.
Refer to “1-1. Basic recording” (→p.64), steps (1)–(7).
(2) Select the tracks that you want to play back.
Press the REC/PLAY key of the tracks you want to play
back, to set them to PLAY (key lit green).
(3) Select the track(s) that you want to record.
Press the REC/PLAY key of the tracks you want to
record, to set them to REC (key lit red).
(4) Mute the tracks that you will not be using.
Set the CH ON/SOLO mode key to CH ON.
Press the CH ON/SOLO keys to turn off (key unlit) the
tracks that you are not playing or recording, so that these
tracks will be muted.
(5) Record.
Refer to “1-1. Basic recording” (→p.64), steps (8)–(11).
1-4. Trigger recording
Trigger recording is a function that automatically starts re-
cording when the input signal level exceeds a specified val-
ue.
Trigger/RecStart
Recording will start when the input signal level exceeds
the specified value.
You will not be able to execute recording if MIDI SYNC is set
to MTC.
Trigger/Punch In
When the input level exceeds the specified threshold
value while the song is playing, the recorder will switch
from playback to recording.
(1) Prepare for recording.
Refer to “1-1. Basic recording” (→p.64), steps (1)–(5).
(2) Adjust the settings for trigger recording.
Access the REC/PLAY MODE, “Rec/Play” tab page, and
choose either “Trigger/RecStart” or “Trigger/Punch In”
(the TRIGGER LED will light).
(3) Specify the input signal level (“Threshold”) at which
recording will begin.
(4) If you want recording to begin from a time slightly ear-
lier than the moment that the input signal exceeds the
“Threshold” (i.e., so that the attack is recorded), you
can set the “PreTriggerTime.”
Trigger recording will cause recording to start when the
threshold is exceeded, but the PreTriggerTime lets you
prevent the attack of the first note from being cut off.
Tr k32
[*16]
Tr k1
A
B
C
D
E
F
G
H
A
B
C
D
E
F
G
H
Master Trk
A
B
C
D
E
F
G
H
A
B
C
D
E
F
G
H
A
B
C
D
E
F
G
H
A
B
C
D
E
F
G
H
A
B
C
D
E
F
G
H
Tr k2 Trk 3 Tr k4 Trk 5
SONG
(1)
(1)
(2)
(3)
(4)
Recorder