


150
The location that you register for the LOC4/END key is
used for the following purposes.
• Locate point 4 (END location)
• The following location for a track editing operation
Ending location of the expanded/compressed data for
“ExpCmpTrk”
The location that you register for the LOC5 key is used
for the following purposes.
• Locate point 5
• Punch-in location (In Time) for D32XD’s mix automa-
tion event editing (→p.104 “5b. In Time, Out Time”)
The location that you register for the LOC6 key is used
for the following purposes.
• Locate point 6
• Punch-out location (Out Time) for D32XD’s mix auto-
mation event editing (
→
p.104 “5b. In Time, Out Time”)
By pressing the ENTER key, you can finalize a parameter se-
lection or turn it on/off.
Each time you press these keys, you will move to the location
of the previous or next mark. Refer to “Using the MARK
JUMP keys to move” (→p.39).
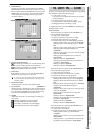
Here you can make settings for trigger, loop, and auto-
punch.
1. Loop Play
If this is on, the region between LOC1/IN and LOC2/
OUT will play back repeatedly. (→p.68)
The LOOP indicator will light at this time.
Loop Play is not available if the “MIDI Sync” setting
(→p.132) is “MTC Slave.”
2. Normal
Recording will occur normally.
3. Trigger recording [Trigger/RecStart, Trigger/Punch In]
Trigger recording will be used. Recording will be started
(“triggered”) when the volume of the input signal
exceeds the threshold level (Threshold) you specify
(→p.66). If you press either of these radio buttons, the
Trigger indicator will light.
Recording will not start if the volume of the input signal does
not reach the threshold level (specified by Threshold). In this
case, press the STOP key to cancel record-ready mode, and
change the “Threshold” setting.
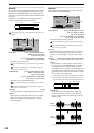
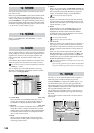
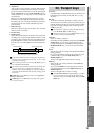
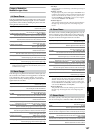
Trigger/RecStart recording
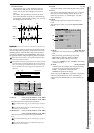
Trigger/Punch-In recording
Trigger/RecStart:
Press the REC key (REC and PLAY keys will blink) to
enter record-ready mode.
When the signal being input to a channel whose REC/
PLAY key is set to REC exceeds the threshold level,
recording will begin automatically.
While in record-ready mode, you can press the STOP
key or REC key to cancel record-ready mode.
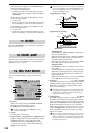
Trigger/Punch-In:
Press the REC key (the key will blink) to enter record-
ready mode.
Press the PLAY key to play back the playback track(s).
When the signal being input to the currently-playing
channel exceeds the threshold level, recording will
begin automatically.
While in record-ready mode, you can press the STOP
key or REC key to cancel record-ready mode.
4. Threshold [–∞, –90.3…–30.8 dB]
Specifies the threshold level for the input signal at which
recording will be triggered when the trigger recording
function is used. Recording will begin when the input
level exceeds this setting.
Normally you should set this as low as possible without allow-
ing recording to be triggered by noise. The appropriate level
will depend on the input source. Re-adjust this setting if re-
cording begins too early or too late.
5. PreTriggerTime [0…600ms]
Specifies the length of sound prior to the record-start
time that will be captured when using trigger recording.
Trigger recording will start recording when the input sig-
nal exceeds the “Threshold” level, but depending on the
threshold setting and on the type of source, the initial
attack of the first note may be lost. In such cases, you can
set the “PreTriggerTime” so that the lower-level portion
of the sound that precedes the actual start of recording
will also be recorded.
This is not valid at the beginning of the song. Also, if you use
trigger recording to continue recording after the end of a pre-
viously-recorded track, a PreTriggerTime setting other than
“000 ms” will cause the corresponding length of the previous-
ly-recorded sound to be lost.
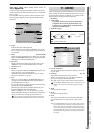
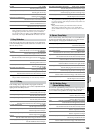
17. ENTER
18. MARK JUMP
19. REC/PLAY MODE
3
1
2
6
4
5
7
8
9
PreTriggerTime
Threshold
Trigger
Record-start location
Stopped
Recording
Record-start location
Recording
Playing
PreTriggerTime
Threshold
Trigger
Start playback