


79
Operation
Song,
Locate
MixerEffects
RhythmRecorder
CDDataDriveUSBMIDIUpgrading
the system
Touch Panel
Calibration
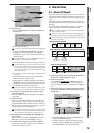
(5) Write the song.
•Press the WriteToCD button to display the Write To
CD dialog box.
• Select the writing speed.
You must use a disc that supports the selected writing speed.
•A message of “Obey Copyright Rules” will appear.
Read the owner’s manual section “COPYRIGHT
WARNING” (→p.iii), and press the Yes button if you
accept the terms.
If the selected song is 24-bit, press the Dither button to turn
it on if you want dithering to be performed.
• The D32XD/D16XD will begin creating an image file.
The data will be written to CD as a 44.1 kHz song. If you se-
lect a song whose sampling rate is other than 44.1 kHz, the
data must be converted, and a certain amount of time will be
required for the conversion to be performed before the song ap-
pears in the track list.
You can abort creation of the image file by pressing the Can-
cel button.
• When the image file has been created, the D32XD/
D16XD will begin writing it to disc.
• When writing is completed, the display will indicate
“Completed.” If you want to create another disc with
the same data, press the Yes button. Otherwise, press
the No button to proceed to the next step.
If you create another disc with the same data, the process will
take less time since the image file has already been created.
(6) If you want to write another song to the CD, repeat
steps (2) through (5).
Each song will be written following the end of the last
song on disc.
(7) Finalize the disc.
When you are finished writing songs to this CD, and
want to be able to play the disc on an audio CD player,
press the Finalize button to finalize the disc. A message
will ask you for confirmation. If you are sure you want
to finalize the disc, press the Yes button.
Once a disc has been finalized, no further songs can be added
to it. In other words, you should finalize a disc only after you
have written all the songs that you intend to write to it.
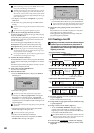
(8) When finalization is completed, the CD-R/RW drive
tray will open.
The LCD screen will indicate “Completed.” Press the
OK button to return to the “CD Utility” tab page.
(9) Check the CD by playing it on an audio CD player.
Play the CD on an audio CD player to verify that your
audio CD was created correctly.
2. Disc At Once
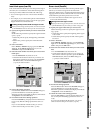
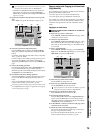
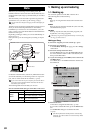
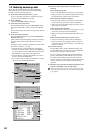
2-1. Album CD Project
If you use Album CD Project to create a CD, you can specify
the amount of silence (blank space) between each track, and
assign marks for each song to specify the beginning of each
track.
In addition, since this method writes the CD using Disc At
Once, the audio CD you create can be used as a master CD for
pressing.
You can create one Album CD Project for each song drive,
and can also back up the data to CD-R/RW (→p.82).
If you use Album CD Project to write a disc, no additional data
can be written to that disc.
When you create an Album CD Project, new audio data for writ-
ing will be created; this will occupy additional hard disk space.
Even if you delete the original songs, the Album CD Project audio
data will not be deleted.
(1) Collect all the songs you want to use for the Album CD
Project into a single song drive (→p.41).
(2) Select the song drive.
Access the CD, CD WRITER
, “Album CD” tab page,
press the Drive button, select the song drive that con-
tains the songs you want to write, and press the OK but-
ton.
(3) Assign your songs to the Album CD Project track list
in the same order that you want them to appear on the
finished CD.
• Select (highlight) TR01, and press the Add button to
display the Add TR dialog box.
• Select the first track of the CD (it will become high-
lighted), and press the OK button. The display will
ask “Are You Sure?”, so press the Yes button.
(7)
(4)
(5)
Song
A
Song
B
Song
C
Song
D
Song
E
Write all songs at once
Select the songs, specify their order, and adjust the gaps
Song
D
Song
E
Song
A
Tr k1
Tr k2
Tr k3
Song
D
Song
E
Song
A
Tr k1
Tr k2
Tr k3
Un-writable area
Post-
gap
Pre-
gap
Post-
gap
Pre-
gap
Songs you have created
Blank space according to the gaps you adjusted
(2)
(3)
(4)
(5)
(7)
CD