


135
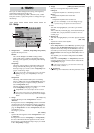
Reference
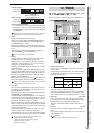
Counter
Rename
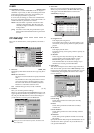
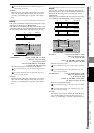
METER
CH
VIEW
MIXEREFFECTCDSYSTEMMIDI/
SYNC
TEMPOSONGTRACKUNDO
STORESCENEMARK
SCRUB
LOC1/IN
...LOC6
ENTERMARK
JUMP
REC/PLAY
MODE
Transport
keys
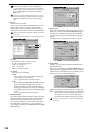
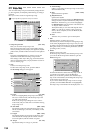
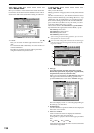
8-3. Tempo Track
Here you can record the tempo track. You can do this in one
of two ways.
• Recording MIDI clock messages
You can synchronize to an external MIDI sequencer by
recording the MIDI Clock messages received from the
external MIDI sequencer so that this data will deter-
mine the tempo of the song.
• Recording tap tempo
You can specify the tempo by tapping (either the
PLAY key or a foot switch) while the song plays back.
If you use this method to specify the tempo of a song
whose tempo is unknown (such as a song recorded
from a CD), you will then be able to edit the tracks in
units of measures.
For the recording procedure refer to “Tempo track” (→p.63).
The above two methods of recording the tempo track store their
data in the same area; only the last-recorded data is maintained. It
is not possible to have two tempo tracks of data.
If the memory becomes full while recording tempo data, recording
will end automatically.
1. Tempo Track [MIDIClock, MeasTap, BeatTap]
Selects the type of tempo track to be recorded.
MIDIClock:
The tempo track will be created by recording MIDI
clock data from a song created on an external
sequencer.
MeasTap:
The tempo track will be created by tapping at the
beginning of each measure.
BeatTap:
The tempo track will be created by tapping at the
beginning of each beat.
2. RecStart
This button displays the record-ready dialog box.
If you are recording MIDI clock messages, recording will
begin when the D32XD/D16XD receives MIDI clock mes-
sages from your external MIDI sequencer.
If you are recording tap tempo, press the PLAY key or the
foot switch. Tap tempo will be recorded according to the
intervals at which you press the key or foot switch.
The tempo will be recorded from the beginning of the song.
The tempo at the measure or beat where you stop tempo record-
ing will be automatically copied all the way to the end of the
song.
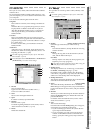
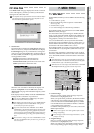
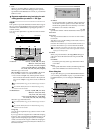
9-1. Select Song
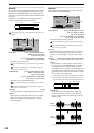
1. Select Song window
Here you can select a song. When you select a song, the
song name will be highlighted. The top line shows the
song to which your recording, playback, and editing
operations will apply (i.e., the “current song”). The EDIT
symbol will appear when you record or edit the song.
When you save the recorded or edited content, the EDIT
symbol will disappear (→p.42).
The display shows the song number:, song name, sam-
pling frequency, bit depth, protect setting, and date the
song was last modified.
If you want to select songs from another drive, press the
Drive button and select a drive.
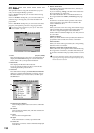
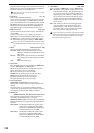
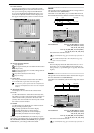
2. Drive [I, A…D]
Here you can choose the current drive. When you press
this button, the Select Drive dialog box will appear.
In the drive window, press a drive name to select it.
Press the OK button to confirm your selection. If you
decide not to change drives, press the Cancel button.
If you want to rename the song drive, press the Rename
button to display the Rename dialog box, and edit the
song drive name. You can input a name of up to sixteen
characters. (→p.97)
3. Select
Press this button to load the song you highlighted in the
song list (i.e., to make it the current song).
4. New
Press this button to create a new song in the currently
selected drive. The new song will be created following
the last song in the current drive.
The New Song dialog box will appear when you press
this button. Use the radio buttons to specify the sampling
frequency and bit depth for the new song, and press the
OK button.
1
2
9. SONG
1
3 4
5
2
Drive
window
SONG TEMPO