


42
(3) Press the ON button.
(4) When the display indicates “Completed,” press the
OK button.
The dialog box will close, and you will return to the
“EditSong” tab page.
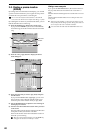
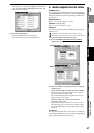
(5) Notice that a lock symbol “ ” is displayed for the cur-
rent song, indicating the song is protected.
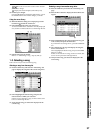
Protect Off
(1) Select the song that you want to un-protect. (→p.37)
Protected songs are indicated by a lock symbol “ ”.
(2) In the SONG, “EditSong” tab page, press the Protect
button to display the Protect Song dialog box.
Verify the drive name and song number of the song that
you want to un-protect.
(3) Press the OFF button.
(4) When the display indicates “Completed,” press the
OK button.
The dialog box will close, and you will return to the
“EditSong” tab page.
(5) Verify that the lock symbol “ ” is no longer displayed
for the current song.
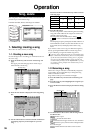
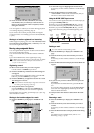
Saving a song
Since the D32XD/D16XD automatically saves song data and
parameters when you perform the shut-down operation or
when you select a song, it is not absolutely necessary for you
to save manually.
However if the power should be interrupted by a power fail-
ure or other accident, the data that has been recorded or ed-
ited since the most recent power-on (or since a song was last
selected) will be lost.
We recommend that you use this command to save the data
periodically after recording or editing for an extended peri-
od, or if you are using the D32XD/D16XD in an environment
where the power supply is unreliable.
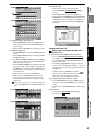
(1) In the SONG, “EditSong” tab page, press the Save
Now button to display the Save Song dialog box.
(2) Verify the drive name and song number of the song
you will save.
(3) To save the song, press the Yes button.
If you decide to cancel, press the No button to close the
dialog box.
(4) When the display indicates “Completed,” press the
OK button.
The dialog box will close, and you will return to the
“EditSong” tab page.
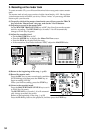
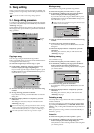
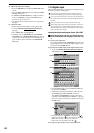
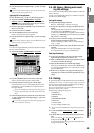
1. Inputting audio to the mixer
The D32XD/D16XD provides eight channels of analog input
(sixteen channels if the optional 8-channel analog input
board is installed) and one digital input jack (two if the op-
tional ADAT I/O board is installed).
The audio signals coming from devices connected to these
jacks can be assigned to the mixer channels and recorded.
Audio from the internal rhythm tone generator or the CD-R/
RW can also be assigned to the mixer channels.
Here’s how to assign each input to a mixer channel and check
the audio signal.
1-1. Analog input
You can connect audio sources such as guitars, keyboards, or
mics to the analog input jacks.
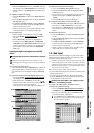
Inputting audio from a guitar
Connecting a guitar to the GUITAR IN jack and assigning
it to mixer channel 1.
(1) Connect the guitar.
Lower the MASTER fader, and then connect the guitar
to the GUITAR IN jack.
(2) Select INPUT 1 as the audio source.
• Access the MIXER, INPUT/OUTPUT/CH ASSIGN
,
“Ch Assign” tab page.
• Use the buttons to set the CH1 “SOURCE” to
“1”. You can also use the value dial or the +/– keys to
make your selection.
The GUITAR IN jack is shared with the INPUT 1 jack. Spec-
ify its input channel and adjust its input level as INPUT 1.
(2)
(3)
(2)
(3)
Mixer
1ch 2ch 3ch 32ch
[*16ch]
Analog
inputs 1–8
S/P DIF
L, R
Channel assignment
28 inputs
Analog
inputs 9–16
(optional)
ADAT
inputs 1–8
(optional)
Internal
rhythm
Internal
CD-R/RW
Input channels
32 [*16]-channel
mixer