


2
The Pattern Mode
13. Loading from Memory Card or Disk
RS7000 131
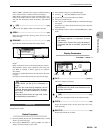
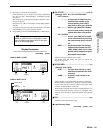
9 IMPORT...........................................................................[F4]
Executes the import operation.
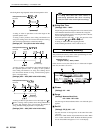
If the destination pattern or sample voice already contains
data the “Are You Sure? No[F2]/Yes[F3]” confirmation
prompt will appear.
Press [F3] if it is OK to overwrite the corresponding memory
contents.
Press [F2] to abort the load operation and return to the status
of the RS7000 prior to pressing the [F1] button.
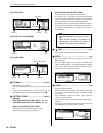
Provides access to a number of SCSI settings.
Selects the disk and partition for save and load operation.
SCSI Setup Procedure
1. Press [LOAD] 3 times from the PATTERN Play or Patch
mode to go to the SCSI Setup page.
2. Use [Knob 4] (SELF ID) to set the RS7000 SCSI ID number.
3. Use [Knob 1] (MOUNT ID) the select the SCSI ID number
of the disk to be mounted, then press [F1] to mount the
selected device.
4. Use [Knob 2] (MOUNT PARTITION) to select the partition
to be mounted.
16 partitions are displayed in the list.
Press [F3] (NEXT) to the next 16 partitions. Press [F3]
(PREV) back to the previous 16 partitions.
5. Press [EXIT] 3 times to return to the PATTERN Play or Patch
mode.
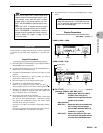
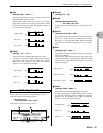
Display Parameters
[PATTERN] → [LOAD] × 3
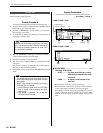
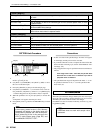
1 MOUNT ID.....................................................[Knob 1], [F1]
[Settings]
0 ~ 7 (the current SCSI SELF ID number cannot be
selected)
Selects and mounts the SCSI device (disk) which will be used
for file transfer.
Use [Knob 1] to select the SCSI ID number, then press [F1]
to mount the selected device. Once the selected device is
mounted it will be possible to select a partition on the device.
2
MOUNT PARTITION
........................................... [Knob 2]
Selects a partition for file transfer operations from among the
partitions available on the mounted disk.
3
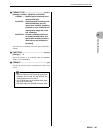
SCSI SELF ID ...................................................... [Knob 4]
[Settings] 0 ~ 7 (the current MOUNT ID cannot be
selected)
Sets the SCSI ID number of the RS7000.
SELF ID changes take effect after the RS7000 has been
restarted.
4
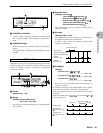
NEXT/PREV.................................................................. [F3]
16 partitions are displayed in the partition list.
Press [F3] (NEXT) to scroll to the next 16 partitions. Or press
[F3] (PREV) to scroll back to the previous 16 partitions.
NOTE
When an RM1x PATT file is imported all data
originally in the destination style number will be
erased.
[3] SCSI Setup Page
NOTE
The new SCSI ID number will take effect the
next time the RS7000 power is turned on (i.e.
the system is re-booted). Be sure to restart the
RS7000 (turn the power off and on again) after
changing the SCSI ID number.
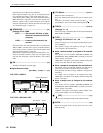
2134
[Knob 1]
[F1]
[Knob 2] [F3] [Knob 4]