


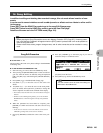
1. Recording Samples (Sampling)
RS7000 233
5
The Sampling Mode
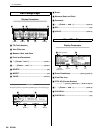
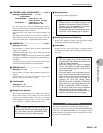
2 TRIGGER LEVEL, PUNCH-IN/OUT..........[Knob 4]
[Settings] TRIGGER LEVEL 0 ~ 127
PUNCH-IN/OUT
PATTERN MODE .....PUNCH-IN 001 ~ 255,
PUNCH-OUT 002 ~ 256, END
SONG MODE ............PUNCH-IN 001 ~ 998,
PUNCH-OUT 002 ~ 999
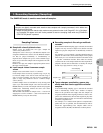
Sets the trigger level when the LEVEL trigger mode is
selected, or the punch-in and punch-out measures when the
MEASURE trigger mode is selected.
The trigger level is the signal level at which sampling will
begin.
The punch-in/out measures are the measure numbers at
which sampling will begin and end. Press [F4] to move the
cursor to move the cursor to the PUNCH-OUT parameter.
3
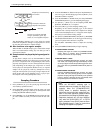
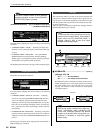
ASSIGN KEY.........................................................[Knob 1]
[Settings] C-2 ~ G8
This parameter is available when the KIT or KIT+NOTE
sample type is selected.
Specifies the Sample Kit Voice note to which the recorded
sample will be assigned.
If a sample is already assigned to the specified note “USED”
will appear, and “EMPTY” will appear if the specified note is
unassigned.
A sample previously assigned to the specified note will be
erased and replaced by the newly assigned sample.
4
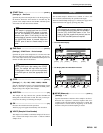
ORIGINAL KEY....................................................[Knob 1]
[Settings] C-2 ~ G8
This parameter is available when the PITCH sample type is
selected.
Specifies the key (note) that will play the sample at the
pitch at which it was originally recorded.
5
Track Number
[Settings] 01 ~ 16
The number of the selected track
6
Sample Voice Number
The currently selected sample voice number (the number of
the next empty sample voice if a sample voice is not currently
selected). The displayed sample voice will be overwritten
when sampling is executed. 001 ~ 128 are local sample
voices, and C001 ~ C128 are common sample voices.
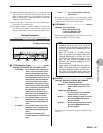
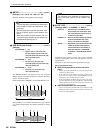
7
Sampling Time
Displays the available sampling time.
8
Sampling Frequency, Mono/Poly
Displays the sampling frequency and mono/stereo settings
made in the Sampling Setup page (Page 231).
9
Level Meter
Displays the level of the input signal. A clipping indicator
will appear to the right of the level meter if the input signal is
too large.
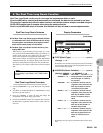
This display appears while waiting for the sampling trigger.
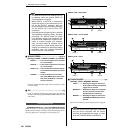
This page is selected by pressing the [STANDBY/START/STOP]
button when the TRIGGER MODE is set to LEVEL or MEA-
SURE. Sequencer playback will begin automatically if the sam-
ple type is set to KIT+NOTE.
NOTE
Select a sample voice via the PATTERN or
SONG mode MIXER Voice Select page (Page
93, 194) before press the [STANDBY/START/
STOP] button to go to the sampling mode.
NOTE
• The total amount of available sampling time
depends on the amount of memory installed.
• Sampling time can sometimes be increased
by executing the OPTIMIZE function.
• The sampling time will not be displayed when
the SLICE + SEQ sampling type is selected.
NOTE
• The input signal level can be adjusted by
using the [REC VOLUME] control when the A/
D INPUT source is selected.
• When the STEREO OUT source is selected
use the PATTERN or SONG mode MIXER
sub mode settings (Page 93, 194) to set the
levels of each track.
• If the input signal is too large when the A/D
INPUT source is selected and the [REC VOL-
UME] control cannot provide enough adjust-
ment, or if the input level is too small, try
changing the input gain setting. Press
[SETUP] twice from the SONG or PATTERN
mode to go to the A/D Setup page, then use
[Knob 1] to select MIC or LINE, as required.
• Try to get the input level as high as possible
without clipping for the best sound quality.
• The input level cannot be adjusted when the
DIGITAL or OPTICAL source is selected.
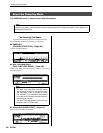
Trigger Conditions Page