


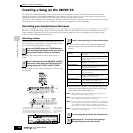

Creating a Song on the MOTIF ES
108
Owner’s Manual
Quick Guide — Advanced Course
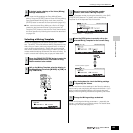
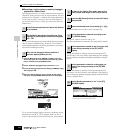
1 Press the [SF1] AUDITION button to hear the recorded sample.
2 Set the start and end points to determine the actual portion of
the sample to be used.
The “Start” parameter determines the actual start of the sample
(letting you cut unwanted sound at the beginning), while the “End”
parameter determines the end of the sample (letting you cut
unwanted sound at the end).
Pressing [SF3] SET END calls up the following convenient display
for making rhythmically accurate End point edits.
Many commercially available sample/loop CDs include information
on the tempo and meter of specific loops. Use that information to
make the settings here and ensure proper playback.
After setting the parameters (above right), press the [ENTER]
button to automatically determine the proper End point. Listen
back to the edited sample by pressing the [SF1] AUDITION button.
If you’re satisfied with the results, press the [F6] OK button. If
you’re not and you want to continue editing, press [F5] CANCEL.
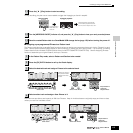
3 Once you’ve trimmed the sample above, you may want to
delete the unneeded portions of the sound (before and after
the Start/End points), to free up memory space. Press the
[SF4] EXTRACT button to delete this excess data.
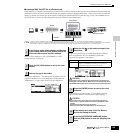
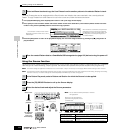
4 Press the [F2] SLICE button to call up the Slice display.
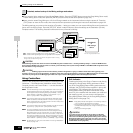
1 Set the parameters shown below.
Set other parameters as necessary, referring to page 254.
2 Press the [ENTER] button (the display prompts you for
confirmation), then press the [INC/YES] button to execute the
Slice.
3 Confirm the result of the operation.
Play the assigned keys in order (C3, C#3, D3, etc.) to hear the
individual slices of the sample.
To hear how the resulting pattern would sound when played by
MIDI sequence data, press the [SF1] AUDITION button.
4 If you’re satisfied with the results of the Slice operation, press
the [F6] OK button.
If you’re not satisfied with the results and want to continue editing,
press the [F5] CANCEL button and attempt the operation again
from step #10-1 above.
9
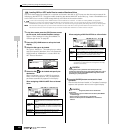
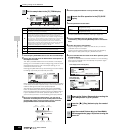
Edit the sample data in the [F1] TRIM display.
A
These parameters determine the portion of the sample that will be used.
B
Press the [SF1] AUDITION button to sound the recorded sample
according to the settings in this display.
C
When the menu indication here is “LP=ST,” the Start (Start Point) and the
Loop (Loop Start Point) will share the same address, meaning that both
of them will be changed simultaneously, even if just one of them is
changed. Pressing the [SF2] button in this condition changes the menu
from “LP=ST” to “LP≠ST.” When the menu indication here is “LP≠ST,” the
Start (Start Point) and the Loop (Loop Start Point) can be changed
independently. When pressing the [SF2] button in this condition, the
address value of the Start will be copied to the one of the Loop, with the
result that both of them share the same address value. The menu
indication also changes from “LP≠ST” to “LP=ST.”
D
See below.
E
Press the [SF4] EXTRACT button to delete all unnecessary sample data
(located ahead of the Start point and located after the End point).
F
Press the [F5] and [F6] buttons to zoom in and out of the wave display.
A
BCDEF
Start
(Start Point)
Loop
(Loop Point)
[SF4] EXTRACT
End
(End Point)
Start
(Start Point)
Loop
(Loop Point)
End
(End Point)
10
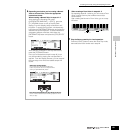
Execute the Slice operation in the [F2] SLICE
display.
Measure Determines the number of measures the sample is
recognized as having.
Meter Determines the rhythmic meter the sample is
recognized as having.
11
Return to the Pattern Play mode by pressing the
[PATTERN] button or [EXIT] button.
12
Press the [FF
FF
] (Play) button to play the created
Pattern.
13
Save the created Pattern data to a SmartMedia/
USB storage device (page 132) before turning the
power off.
Slice display (before executing Slice)
Slice display (after
executing the Slice)
[ENTER] button
[F5] CANCEL button