


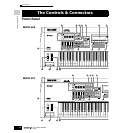
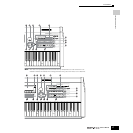
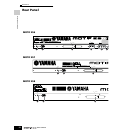

Front Panel
19
Owner’s Manual
The Controls & Connectors
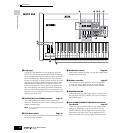
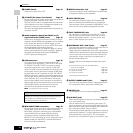
8 [CS1] - [CS4] (Control Slider) Page 51
These sliders control the volume of four elements which
make up a Normal Voice in the Voice mode, the volume of
four parts in the Performance mode, the volume of four
parts including the current part in the Song mode/Pattern
mode, and the volume of four zones in the Master mode.
n If all of the Control Sliders are set to the minimum, you may not
hear any sound from the instrument, even when playing the
keyboard or a song/pattern. If this is the case, raise all the sliders
to a suitable level.
n The [MASTER VOLUME] slider adjusts the output level from this
instrument. On the other hand, the Control Slider adjusts the MIDI
volume value for the corresponding element or part.
9 REMOTE buttons Page 147
The Remote mode lets you control sequencer software on
your computer from the panel controls of the instrument.
Turn the [ON/OFF] button on to enter the Remote mode.
You can use the [R-AUDIO/G-MIDI] button to switch
control between your audio tracks (red lamp) and MIDI
tracks (green lamp), when Mode A or B is set to “General”
([UTILITY] → [F4] CTL ASN → [SF4] REMOTE).
n When setting the MIDI IN/OUT parameter to “MIDI” ([UTILITY] →
[F5] MIDI → [SF4] OTHER) or setting both of Mode A and Mode B
to “off” ([UTILITY] → [F4] CTL ASN → [SF4] REMOTE), you
cannot enter the Remote mode even by pressing the REMOTE
[ON/OFF] button. Set these parameters to appropriate values
(page 148) then enter the Remote mode.
) EFFECT buttons Page 177
The extensive effect section of the instrument provides
Insertion effects (eight sets, with two effect units per set),
System effects (Reverb and Chorus), and Master effects.
The effects can be applied to the keyboard-played voices
and to Song/Pattern playback. These three buttons enable
you to turn the corresponding Effect blocks (as printed on
the panel) on or off with a single touch.
Keep in mind that the [INSERTION] and [SYSTEM] buttons
are bypass switches, while the [MASTER EFFECT] button
is an on/off switch. The distinction is important — when
the lamp of the [INSERTION] or [SYSTEM] button is on,
the effect is off (or bypassed). The [MASTER EFFECT]
button is the opposite: when the lamp is on, the Master
effect is on. Also, to access the Master Effect setting
display, press and hold the [MASTER EFFECT] button for
a second or two.
! [ARPEGGIO ON/OFF] button Page 66
Press this button to enable or disable playback of the
Arpeggio for each Voice, Performance, Song, or Pattern. If
the Arpeggio Switch of the selected part is set to off in the
Performance/Song/Pattern mode, however, pressing this
button has no effect.
R
E
E
SCENE
SF1 SF
2 SF3 SF4 SF5
F1 F2 F3 F4 F5 F6
COMMON
ELEMENT/ PERF. PART/ZONE
FAVORITES
DRUM KITS
A. PIANO KEYBOARD ORGAN
PRE 5 PRE 6
PRE 1 PRE 2 PRE 3 PRE 4
MUSIC PRODUCTION SYNTHESIZER
Integrated Sampling Sequencer /
Modular Synthesis Plug-in System / Real- time External Control Surface
USER 1
GUITAR/
PLUCKED
SYN LEAD
ABCDEFG
H
87654321
16
MUTE
TRACK
SELECT
SECTION
GROUP
NUMBER
CATEGORY
SEARCH
BANK
SOLO
15
1412 13
11
10
9
SYN PAD/
CHOIR
SYN COMP
CHROMATIC
PERCUSSION
DRUM/
PERCUSSION
SE MUSICAL FX COMBI
USER 2
STRINGS
PLG 1
SLOT 1 SLOT 2 SLOT 3
BRASS
PLG 2
REED/PIPE
PLG 3
BASS
GM
INFORMATION
DEMO
EXIT ENTER
EXECUTE
DEC/NO INC/YES
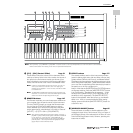
C3 C4 C5 C6 C7
$ % (¡ º ∞
^ •& ¶* £ ¢
™
§
ª
‚
⁄
¤
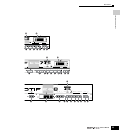
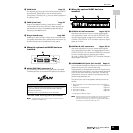
n When [UTILITY] → [F1] GENERAL → [SF2] KBD → Octave is set to “0,” each key corresponds to the note name shown in the illustrations.
Refer to this illustration when setting a note name of a parameter like Note Limit.