


Quick Guide — Advanced Course
Creating a Voice by using the Sampling function
97
Owner’s Manual
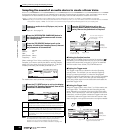
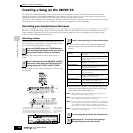
Assign the Samples obtained via the Sampling function to specific Key Ranges to create a Waveform. Because the Waveform data
including Samples which resides temporarily in DIMM (page 187) is lost when the power is turned off, you should always save the
Waveform data or Samples to a SmartMedia/USB storage device before turning off the power. The following four methods can be used to
save a Sample that is assigned to a Waveform. Execute the Save operation in the File mode.
While the data is being saved, make sure to follow these precautions:
•Never remove or eject the media from the device (SmartMedia or USB storage).
•Never unplug or disconnect any of the devices.
•Never turn off the power of the MOTIF ES or the relevant devices.
● Saving as a User Voice
When you save a User Voice that contains Samples, all the
related data — the Waveform assigned to the Voice, the
Samples assigned to the Waveform, as well as the User Voice
itself — is automatically saved together. Insert a SmartMedia
into the CARD slot or connecting the USB storage device to
this synthesizer, and follow the instructions below.
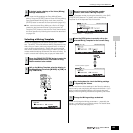
1 Press the [FILE] button to enter the File mode, then
execute the basic settings.
Refer to “Basic settings for using SmartMedia or a USB
storage device” on page 30.
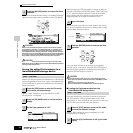
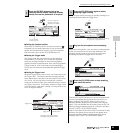
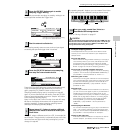
2 Press the [F2] SAVE button to call up the Save display.
3 Set the TYPE parameter to “All” or “AllVoice.”
When “All” is selected, execute the Save operation to save
all the created data including the User Voices as a single
file. When “AllVoice” is selected, execute the Save
operation to save all User Voices, including Waveforms
assigned to Normal Voice Elements or Drum Voice Keys, as
a single file.
4 Input a file name.
Move the cursor to the file name input location, then input a
file name. For detailed instructions on naming, refer to page
53 in the Basic Operation section.
5 Press the [ENTER] button to execute the Save
operation.
If you are about to overwrite an existing file, the display
prompts you for confirmation. Press the [INC/YES] button to
execute the Save operation to overwrite the existing file, or
press the [DEC/NO] button to cancel it.
● Saving as a Waveform
When you save a Waveform that makes up a Voice, all the
Samples that are assigned to the Waveform are automatically
saved together. The procedure for saving is the same as
described in “Saving a User Voice” above, with the exception
that Type is set to “AllWaveform” in step #3.
● Saving as a WAV file
You can select a specific Sample from a Waveform and save it
as a WAV file (Windows audio format). Insert a SmartMedia into
the CARD slot or connecting the USB storage device to this
synthesizer, and follow the instructions below.
1 Select a Voice containing the Sample to be saved in the
Voice Play mode, then press the [FILE] button to enter
the File mode, and execute the basic settings.
Refer to “Basic settings for using SmartMedia or a USB
storage device” on page 30.
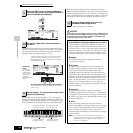
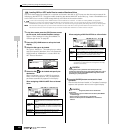
2
Set the TYPE parameter to “Wav” in the [F2] SAVE display.
3 Input a file name.
Move the cursor to the file name input location, then input a file
name. For detailed instructions on naming, refer to page 53 in
the Basic Operation section.
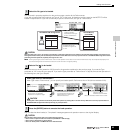
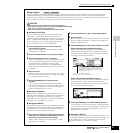
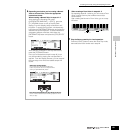
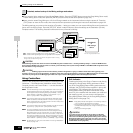
4 Press the [ENTER] button, then select a Sample to be saved.
When a Normal Voice is selected in step #1:
Specify the Element and Key Bank to call up the Sample
assigned to the selected Voice. You can hear the Sample by
pressing the [SF1] AUDITION button. Go through the Samples
in this way to find the desired Sample.
When a Drum Voice is selected in step #1:
Specify the Note and Key Bank to call up the Sample assigned
to the selected Drum Voice. You can hear the Sample by
pressing the [SF1] AUDITION button. Go through the Samples
in this way to find the desired Sample.
5 Press the [ENTER] button to execute the Save operation.
If you are about to overwrite an existing file, the display prompts
you for confirmation. Press the [INC/YES] button to execute the
Save operation and overwrite the existing file, or press the
[DEC/NO] button to cancel it.
● Saving as a AIFF file
You can select a specific Sample from a Waveform and save it as a
AIFF file (Macintosh audio format). The procedure for saving is the
same as described in “Saving as a WAV file” above with the
exception that Type is set to “AIFF” in step #2.
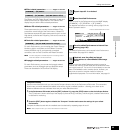
Saving a Sample
[FILE] → [F2] SAVE
CAUTION
This is available only when the cursor is located at
the KeyBank. Each press of the [SF2] button calls up
a different Key Bank assigned to a specific velocity
range (for the same key).
You can hear the selected sample by
pressing the [SF1] button. (Audition function)
You can hear the selected sample by pressing
the [SF1] button. (Audition function)