


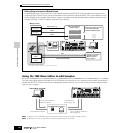
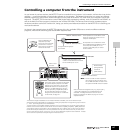
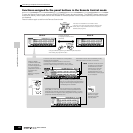
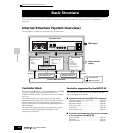

Controlling a computer from the instrument
149
Owner’s Manual
Quick Guide — Computer applications
■ Cubase SX
1 Pull down the [Devices] menu and select [Device Setup]
to call up the “Device Setup” window.
2
Click the [Add/Remove] tab and add the “Mackie Control.”
3 Select the added Mackie Control device and click the
[Setup] tab.
4 When setting the Port to “4,” for example, in step #3 of
“Setting up on the MOTIF ES,” set the MIDI Input to
“YAMAHA USB IN 0-4” and the MIDI Output to
“YAMAHA USB OUT 0-4.”
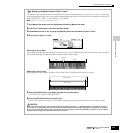
n The functions of buttons on the Mackie Control are assigned to the
buttons of the MOTIF ES, with the exception of UserA and UserB
(FootSw) which are not supported by the MOTIF ES.
■ SONAR
1 Pull down the [Options] menu and select [MIDI Devices]
to call up the “MIDI Devices” window.
2 When setting the Port to “4” for example in step #3 of
“Setting up on the MOTIF ES,” add “YAMAHA USB IN
0-4” to the “Inputs” and add “YAMAHA USB OUT 0-4” to
the “Outputs.”
3 Pull down the [Options] menu and select [Control
Surfaces] to call up the Control Surface window.
4 Click the “New” icon, select “Mackie Control,” then set
the Input Port to “YAMAHA USB IN 0-4” and the Output
Port to “YAMAHA USB OUT 0-4” (for example, when
setting the Port to “4” in step #3 of “Setting up on the
MOTIF ES”).
■ Digital Performer
1 Pull down the [Basics] menu and select [Control
Surface Setup] to call up the “Control Surface” window.
2 Select “Mackie Control” in the Driver section.
If Mackie Control is not available here, see the
supplementary instructions below.
3 In the box for setting “Unit” and “MIDI,” select “Mackie
Control” in the “Unit” section and select the MIDI port in
the “MIDI” section.
When you cannot select “Mackie Control” in step #2:
1) Download the Mackie Control Plug-in software from
“www.motu.com” and save it to your hard disk.
2) Move the Mackie Control file to the “Plug-ins” folder
contained in the folder to which Digital Performer has
been installed.
3) Start Digital Performer.
* Mackie Control is the trademark of Mackie Designs, Inc.
■ Logic
When turning on the power of the MOTIF ES before
starting Logic:
1 Set the software to be controlled to “Logic” in the Utility
mode, then enter the Remote Control mode.
2 Start Logic on the computer.
Logic automatically recognizes the MOTIF ES and
performs the required settings.
When starting Logic before turning on the power of the
MOTIF ES:
1 Start Logic on the computer, then turn the power to the
MOTIF ES on.
If you have already set the software to be controlled to
“Logic” in the Utility mode, you need not perform step #2
because Logic automatically recognizes the MOTIF ES
when this step is performed.
2 Set the software to be controlled to “Logic” in the Utility
mode, then enter the Remote Control mode.
Logic automatically recognizes the MOTIF ES and
performs the required settings.
If for some reason Logic fails to recognize the MOTIF ES,
follow the instructions below.
1) Select [Option] →→
→→
[Preference] →→
→→
[Control Surface] →→
→→
[Install] from the menu.
2) Scan Logic Control on the window called up in step #1).
When the scanning is successful, the Logic recognizes the
MOTIF ES and performs the required settings automatically.
If Logic still fails to recognize the MOTIF ES even after
performing the above instructions, follow the instructions
below.
1) Select [Option] →→
→→
[Preference] →→
→→
[Control Surface] →→
→→
[Install] from the menu.
2) Add Logic Control on the window called up in step #1).
3) Specify the Input Port and Output Port on the
CONTROL SURFACE SETUP window called up in step
#2).
* Logic Control is the registered trademark of Emagic, Inc.
■ SQ01
For information about how to set the MIDI port, refer to the
separate Installation Guide. For information on using Remote
Control, follow the instructions below.
1 Select [Setup] →→
→→
[Remote Control] to call up the
Remote Control Setup window.
2 Select “01X” as mode, then set the Input Device/Output
Device to the appropriate port number.