


Quick Guide — Advanced Course
Editing a Performance
89
Owner’s Manual
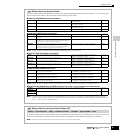
● Effect related parameters ................ Pages 177 and 215
The Effects use DSP (Digital Signal Processing) to alter and
enhance the sound of a Performance. The Common Edit
display lets you edit the Effect related parameters.
● Master EQ related parameters ........ Pages 178 and 214
These parameters let you use the five-band Master EQ to
process the overall sound of the Performance. Master EQ
also features separate EQ shape parameters for the Low and
High bands, as well as the Frequency, Gain and Q controls for
each band.
● Controller related parameters........... Pages 155 and 214
For each Performance, you can assign the Control Change
Number to built-in controllers such as Ribbon Controller,
Knobs (ASSIGN1 and 2), and optionally connected
controllers, such as Foot Controller and Breath Controller.
n Functions assigned to Controllers depend on the settings of each
Part’s Voice edited in the Voice Edit mode.
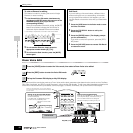
● Arpeggio related parameters............. Pages 169 and 214
For each Performance, you can set the Arpeggio related
parameters, such as Arpeggio type and playback tempo.
These can be edited in the Common Edit display.
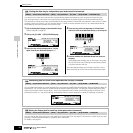
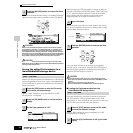
Enter a name for the Performance from the NAME display
([COMMON] → [F1] GENERAL → [SF1] NAME).
For detailed instructions on naming, refer to page 53 in the
Basic Operation section.
The edited Performance can be stored in the Performance
Store mode. See page 91 for details.
Keep in mind that edited Performance data is stored to
internal User memory (Flash ROM) and is stored even when
turning the power off. As such it is not necessary to save the
data to SmartMedia card or another device; however, you
may want to save it to another media for backup or
organizational purposes. For more information, see page 91.
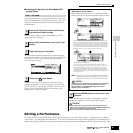
Compare Function
Just as in the Voice Edit mode, you can use the Compare function also in the Performance Edit mode. This convenient
function lets you switch between the edited voice and its original, unedited condition – allowing you to listen to the
difference between the two and better hear how your edits affect the sound.
1 In the Performance Edit mode (with the [EDIT] indicator lit), press the [EDIT] button so that its indicator flashes.
The [C] indicator is shown at the top of the display (in place of the [E] indicator), and the original, unedited Performance
is restored for monitoring.
2 Press the [EDIT] button again to disable the “Compare” function and restore the settings for your edited
Performance.
Compare the edited sound with the unedited sound as desired by repeating steps #1 and 2.
n While Compare is active, you cannot make edits to the Performance.
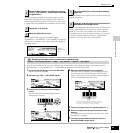
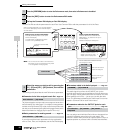
[COMMON] → [F6] EFFECT
[COMMON] → [F2] OUT/MEF → [SF3] MEF (Master Effect)
[COMMON] → [F4] CTL ASN (Controller Assign)
5
Repeat steps #3 - 4 as desired.
6
Name the edited Performance.
7
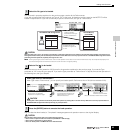
Store the edited Performance to internal User
memory (page 186).
8
If desired, save the edited and stored
Performances to a SmartMedia/USB storage
device.
Enter the desired Performance name.