


Information Display
53
Owner’s Manual
Basic Operation
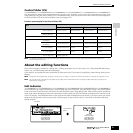
Information Display
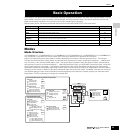
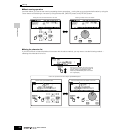
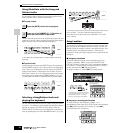
This convenient function lets you call up relevant details about the selected mode – simply by pressing the [INFORMATION]
button. For example, when the Voice mode is active, you can quickly check information about which voice bank is selected, what
Play mode (poly or mono) is being used, which effects are applied, and so on.
For details, see page 275.
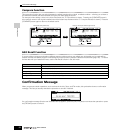
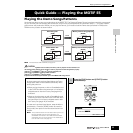
Note (Key) settings
Several parameters let you set a key range for a function – for example, in setting up a keyboard split – by specifying certain
note values. You can use the [INC/YES] and [DEC/NO] buttons or data dial to set these parameters, or you can directly enter the
values from the keyboard by pressing the appropriate keys (as shown below).
n About the note name assigned to each key, see page 16.
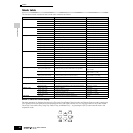
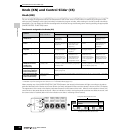
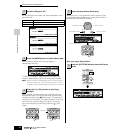
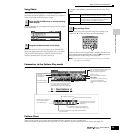
Naming
You can freely name the created data like Voice and the file saved to the SmartMedia/USB storage device. The chart below lists
the types of data that can be named along with the operations for calling up the respective naming displays.
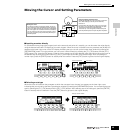
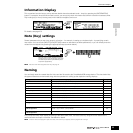
First, call up the name input display according to the above table, then, move the cursor by using the Cursor button to the
desired location and input a character. See below for details.
n Since the name of the program is part of the data, make sure that you properly save the program after naming it.
Data types that can be named How to call up the naming display Page
Voice [VOICE] → [EDIT] → [F1] GENERAL → [SF1] NAME 80
Performance [PERFORM] → [EDIT] → [F1] GENERAL → [SF1] NAME 89
Song [SONG] → [JOB] → [F6] SONG → 04: Song Name 233
Pattern [PATTERN] → [JOB] → [F6] PATTERN → 05: Pattern Name 248
Mixing Template [SONG] or [PATTERN] → [MIXING] → [JOB] → [F6] TEMPLATE 237
Mixing Voice [SONG] or [PATTERN] → [MIXING] → [F5] VCEED → [F1] GENERAL →[SF1] NAME 106
Phrase [PATTERN] → [JOB] → [F4] PHRASE → 09: Phrase Name 246
Master [MASTER] → [EDIT] → [F1] NAME 138
Waveform [INTEGRATED SAMPLING] → [JOB] → [F2] WAVE → 04: NAME 259
Arpeggio [SONG] → [JOB] → [F5] TRACK → 07: Put Track To Arp 130
[PATTERN] → [JOB] → [F5] TRACK → 06: Put Track To Arp 130
Volume Label of the SmartMedia/
USB storage device
[FILE] → [F1] CONFIG → [SF3] FORMAT 266
File/Folder saved to the SmartMedia/
USB storage device
[FILE] → [F2] SAVE or [F4] RENAME 132
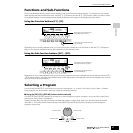
INFORMATION
INFORMATION
When Note Limit is selected, the [KBD] mark appears,
indicating that you can use the keyboard to set the value.
Simultaneously hold down the [INFORMATION] button
and press the appropriate key.