


Reference Sampling Mode
Sampling Job mode
258
Owner’s Manual
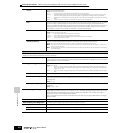
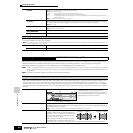
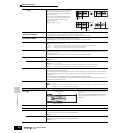
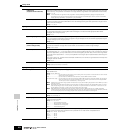
Length Determines the length of the fade-in or fade-out.
When a fade-in is selected, this parameter
specifies the length of the fade starting at the
specified Start point.
When a fade-out is selected, this parameter
specifies the length of the fade starting at the
beginning of the fade and ending at the
specified End point.
Settings: 0000000 ~ End point
09: Convert Freq
(Convert Frequency)
This Job lets you halve the sampling frequency of the specified sample. This can be used to convert hi-fi samples to
a lo-fi sound, and reduce the sample size by half to conserve memory.
The basic steps in using this Job are the same as in 05: Normalize explained above.
10: Stereo to Mono
This Job lets you convert a stereo sample to a mono sample.
The basic steps in using this Job are the same as in 05: Normalize explained above.
Type Determines which channel, or both channels, of the stereo sample will be converted to a mono sample.
Settings: L+R>mono, L>mono, R>mono
L+R>mono.......The left and right channels of the stereo sample are mixed and converted to a mono sample.
L>mono............The left channel of the stereo sample is converted to a mono sample.
R>mono ...........The right channel of the stereo sample is converted to a mono sample.
11: Loop-Remix
This Job lets you automatically cut the sample into separate “slices” and randomly rearrange the slices for special
effects and unusual rhythmic variations. A variety of audio transform operations are also included for even greater
changes in the sound.
The basic steps in using this Job are the same as in 05: Normalize explained above.
Type Determines the degree to which the looped portion of the sample will be sliced.
Settings: 1~4
Variation Determines how the original sample is varied by the this Job.
Settings: normal1~2, reverse1~2
normal1~2........These settings slice and rearrange the sample data, without performing any other audio changes.
reverse1~2.......In addition to slicing and rearranging, these settings reverse the playback of some of the slices.
12: Slice
This Job lets you divide the sample into separate “slices,” the number of which is determined by the note length
(with Measure, Meter, and SubDivide).
When entering this Job from the Song/Pattern mode, note data for playing the slices in sequence is also created.
(Keep in mind that the results of this Job vary depending on the previously selected mode: Voice/Performance or
Song/Pattern.)
The basic steps in using this Job are the same as in 05: Normalize explained above.
With the exception of the parameter below, all parameters and settings are the same as in the Slice display of the
Sampling Record mode (page 254).
Lowest Key Specifies the lowest key number from which the sliced samples are assigned in order.
Settings: C - 2 ~ G8
n In the Slice display of the Sampling Record mode (page 254), this parameter is fixed to “C-1” for the MOTIF ES6, “E0” for the
MOTIF ES7, and “A-1” for the MOTIF ES8, and cannot be set.
[F2] WAVEFORM (Waveform Job)
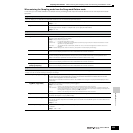
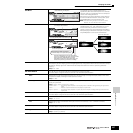
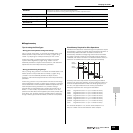
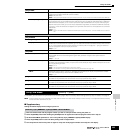
01: Copy
This Job lets you copy the data of one Waveform to
another.
After specifying the source Waveform and destination
Waveform, press the [ENTER] button to execute the
Copy Job.
02: Delete
This Job lets you delete a specific Waveform from memory.
03: Transpose
This Job lets you transpose the Key bank setting of a specified Waveform.
Octave Determines the amount in octaves by which the Key Bank is transposed. When you want to transpose by less than
one octave, set this to “0” and use the Note parameter below.
Settings: -3~ 0 ~+3
Note Determines the amount in semitones by which the Key Bank is transposed. When you want to transpose by exact
octaves, set this to “0” and use the Octave parameter above.
Settings: -11~ 0 ~+11
Length
Start point
Fade In
Length
Start point
Fade Out
Source Waveform
Destination Waveform