


Quick Guide — Advanced Course
Creating a Song on the MOTIF ES
135
Owner’s Manual
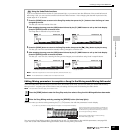
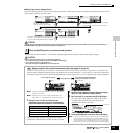
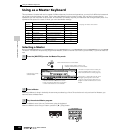
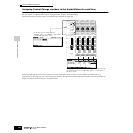
● When Type is set to “Sample Voice”:
Only when entering the File mode from the Song mode/Pattern mode, you can select and load a specified Sample Voice in the
file (extension: W7A) to this instrument.
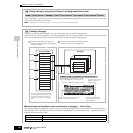
Loading data to this synthesizer automatically erases and replaces any existing data in the User memory. Make sure to save any important data to a
SmartMedia/USB storage device before performing any Load operations.
After the data has been loaded, a “Completed” message appears and operation returns to the original display.
While the data is being saved, make sure to follow these precautions:
•Never remove or eject the media from the device (SmartMedia or USB storage).
•Never unplug or disconnect any of the devices.
•Never turn off the power of the MOTIF ES or the relevant devices.
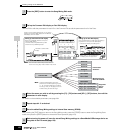
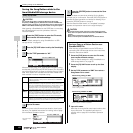
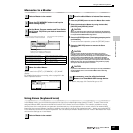
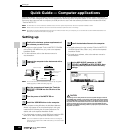
Setting a specific file to load automatically when the power is turned on
The MOTIF ES is very easy to use and you can create Voices, Performances, Patterns and Songs very quickly on it. However, there
may be times that creating and editing of data may be spread out over several sessions. In such a case, you may find it convenient to
have the instrument automatically load the appropriate files for you when you turn it on, so you can easily resume your editing session.
n The Auto Load parameter is set to on when this synthesizer is
shipped from the factory.
n The file types which can be loaded automatically are “All,”
“Plugin All Bulk 1,” “Plugin All Bulk 2,” and “Plugin All Bulk 3.”
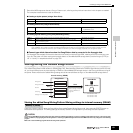
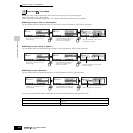
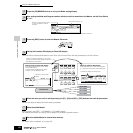
1
Change the names of the files you wish to have load
automatically when the power is turned on as described below,
and save them together in a single folder or in the root directory.
After you’ve finished naming the appropriate files, keep the
corresponding folder selected in the display and go to step #2.
2
Enter the Utility mode and call up the Auto Load display
([UTILITY] →→
→→
[F1] GENERAL →→
→→
[SF4] OTHER).
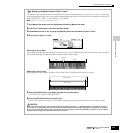
3
Set “Auto Load” to on, and press the [SF5] GET button.
The device and folder selected in step #1 (the folder
containing the desired files for auto loading) are
registered as the Auto Load path.
4
Press the [STORE] button to store the Auto Load setting.
n If the Auto Load files cannot be found (for example, a SmartMedia/USB
storage device is not installed properly or a SmartMedia/USB storage
device containing no Auto Load files is installed, etc.) when turning the
power on even with the Auto Load parameter set to on, the Demo Song/
Pattern data (page 55) in the internal ROM will be loaded automatically.
5
Press the [ENTER] button to execute the Load operation.
ENTER
EXECUTE
ENTER
EXECUTE
ENTER
EXECUTE
ENTER
EXECUTE
Move the cursor to the file
(extension: W7A) which was
saved as “All” on previous page.
Select “Pattern” or “Song.”
All Songs or Patterns which contain the Sample
Voices are listed.
Move the cursor to the desired Song or Pattern.
All Sample Voices assigned to the selected Song
or Pattern in the selected file are listed. Move the
cursor to the desired Sample Voice to be loaded.
Select the track of the current
Song or Pattern as destination.
CAUTION
CAUTION
TIP
MUSIC PRODUCTION SYNTHESIZER MUSIC PRODUCTION SYNTHESIZER
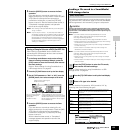
Save the data after editing.
The saved files are loaded automatically
when you turn the power on next time.
Turn the power off
Save
Auto Load
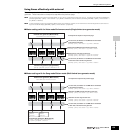
File type File name
All AUTOLOAD. W7A
Plugin All Bulk 1 (for slot 1) AUTOLD1. W7B
Plugin All Bulk 2 (for slot 2) AUTOLD2. W7B
Plugin All Bulk 3 (for slot 3) AUTOLD3. W7B
Set this to on.