


Quick Guide — Advanced Course
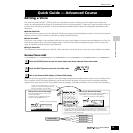
Editing a Voice
83
Owner’s Manual
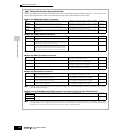
The main parameters available are basically the same as in the
Normal Voice Edit (page 80). What is called Key Edit in the Drum
Voice corresponds to Element Edit in the Normal Voice. Please keep
in mind that the LFO parameters are not available in the Drum Voice.
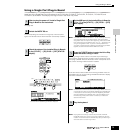
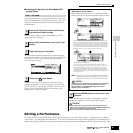
Enter a name for the Voice from the NAME display
([COMMON] → [F1] GENERAL → [SF1] NAME). For detailed
instructions on naming a voice, refer to page 53 in the Basic
Operation section.
The edited Voice can be stored in the Voice Store mode. See
page 85 for details.
Keep in mind that edited Voice data is stored to internal User
memory (Flash ROM) and is stored even when turning the
power off. As such it is not necessary to save the data to
SmartMedia card or another device; however, you may want
to save it to another media for backup or organizational
purposes. For more information, see page 85.
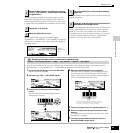
Assigning drum/percussion instruments to individual keys
In the Drum Voice Edit mode, you can create your own original drum kits by assigning specific instrument sounds to
individual keys — in any desired order — and edit detailed parameters for each key’s sound.
1
Call up the Key Edit display in the Voice Edit mode.
Refer to step #3 on page 82.
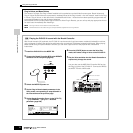
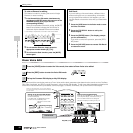
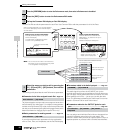
2 Call up the [F1] OSC → [SF1] WAVE display.
3 Press the key to which you want to assign a
sound.
The drum instrument currently assigned to the
pressed key will sound.
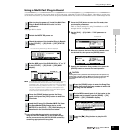
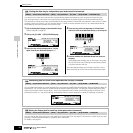
4 Select the desired Waveform to be assigned.
Move the cursor to “Number” and change the value by
using the data dial, [INC/YES] button, and [DEC/NO]
button. Then, press the same key set in step #3 again to
confirm the selected instrument sound.
5
Create your original drum kit by repeating steps #3 - 4.
6 Store the created drum kit as a Drum Voice in User
memory.
The edited Voice can be stored in the Voice Store mode.
See page 85 for details.
7 If desired, save the edited and stored voices to a
SmartMedia/USB storage device.
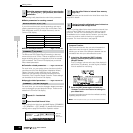
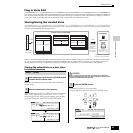
4
Select the desired menu for editing by pressing
the [F1] - [F6] and [SF1] - [SF5] buttons, then edit
the parameters.
5
Repeat #3 - 4 as desired.
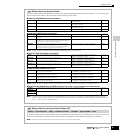
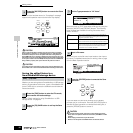
6
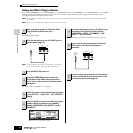
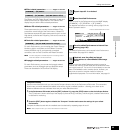
Name the edited Drum Voice.
Enter the
desired Voice
name.
7
Store the edited Voice to internal User memory
(page 186).
8
If desired, save the edited and stored voices to a
SmartMedia/USB storage device.
[VOICE] → Drum Voice selection → [EDIT] → Key selection → [F1] OSC → [SF1] WAVE
TIP
You can also select a different sound category (such as
Percussion, or even a Normal Voice sound), by moving
the cursor to “Category”and changing the setting.