


Reference Sampling Mode
Sampling Record mode When entering the Sampling mode from the Song mode/Pattern mode
254
Owner’s Manual
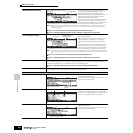
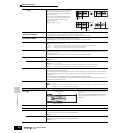
WAITING (Trigger Waiting or
Punch-in Waiting)
When Trigger Mode is set to “level” in the Sampling Standby display, press the [F6] REC button again to enter the
Trigger Waiting condition; the [F6] menu changes to “STOP.” In this condition, sampling will begin as soon as an
input signal exceeding the specified trigger level is received.
When the Trigger Mode is set to “meas” in the Sampling Standby display, press the [F6] REC button again to enter
the Punch-in Waiting condition; the [F6] menu changes to “STOP.” In this condition, sampling will begin as soon as a
song or pattern playback reaches the punch-in measure.
Before recording starts in either condition, press the [F6] STOP button or [EXIT] button to return to the Sampling
Standby display. Keep in mind that the Confirm function can be tuned on or off by using the [F2] CONFM button also
in the Trigger Waiting or Punch-in Waiting condition if the Sampling type is set to other than “slice+seq.”
RECORDING
During recording, press the [F6] STOP button or [EXIT] button to stop sampling.
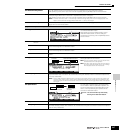
After sampling (recording) stops:
The following menus appear when the Sampling type is set to “sample” or “sample+note” and the Confirm function
is turned on.
[F3] AUDITION Pressing this lets you hear the sample obtained by recording (sampling).
[F4] CANCEL Pressing this deletes the sample obtained by recording (sampling) and return to the Sampling Standby display.
[F5] OK Pressing this stores the sample obtained by recording (sampling) to the specified destination.
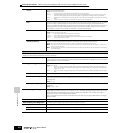
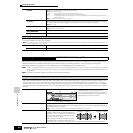
TRIM/SLICE display after
sampling stops
If you’ve entered the Sampling Record mode for the Song or Pattern mode and you’ve set the sampling type to
“slice+seq,” you should set the following Slice related parameters after the Sampling stops.
Please note that the Confirm function is not available in this case.
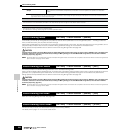
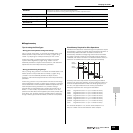
[F1] TRIM
The trim function makes it possible to specify the beginning and end points to be played back within an entire sample. You can also specify the tempo for
the range of the looped playback and determine its beat.
Start (Start Point) Determines the Start point for the sample playback.
Loop (Loop Start Point)
Determines the Top point of the loop playback (the point where the loop begins) within the range of the entire sample.
End (End Point) Determines the End point of the loop playback within the range of the entire sample.
Beat Indicates the (beat) and tempo of the range from the Loop Start Point to the End Point.
[SF1] AUDITION
Press the [SF1] button to sound the recorded sample according to the settings in this display.
[SF2] LP=ST
When the menu indication here is “LP=ST,” the Start (Start Point) and the Loop (Loop Start Point) will share the same
address, meaning that both of them will be changed simultaneously, even if just one of them is changed. Pressing
the [SF2] button in this condition changes the menu from “LP=ST” to “LP≠ST.” When the menu indication here is
“LP≠ST,” the Start (Start Point) and the Loop (Loop Start Point) can be changed independently. When pressing the
[SF2] button in this condition, the address value of the Start will be copied to that of the Loop, with the result that
both of them will have the same address value. The menu indication also changes from “LP≠ST” to “LP=ST.”
[SF3] SET END
Pressing this calls up the display for determining the End Point, from which you can set the tempo, beat, and
measure for the sample. Press the [ENTER] button to actually set End Point. If you are satisfied with the results
(press [SF1] to audition the sample), press the [F6] OK button to return to the original display. Doing this stores your
edited sample to the DIMM memory. To return to the original display without changing the data, press the [F5]
CANCEL button.
[SF4] EXTRACT
Delete all unnecessary sample data located ahead of the Start point and located after the End point) by pressing the
[SF4] button.
[F5] ZOOM-
[F6] ZOOM+
Press the [F5] and [F6] buttons to zoom in and out of the wave display.
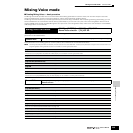
[F2] SLICE
This powerful feature lets you automatically divide the recorded sample into separate “slices.” These slices are then assigned to successive notes and
arranged as sequence data.
n Before executing the Slice operation, you’ll need to accurately adjust the length of the sample. Use the [SF1] AUDITION button in the [F1] TRIM display to loop the sample
and precisely set the Start and End points as required.
After specifying the following parameters, press the [ENTER] button. (The display prompts you for confirmation.) Press the [INC/YES] button to execute the
Slice. You can hear and confirm the sliced samples by pressing the [SF1] AUDITION button. If you are satisfied with the result of the operation, press the
[F6] OK button to store the result of the Slice operation and go back to the Sampling Setup display. If not, press the [F5] CANCEL button to go back to the
Sampling Setup display without storing the result.
Type (Slice Type) Specifies how the sample is sliced, and to some extent determines the resulting sound quality. Select the type that
best suits the original phrase.
Settings: beat1~3, phrase1~4, quick
beat1~3 ...........This slice type is suited for percussive phrases such as drums or bass with a fast attack and short decay. Three
variations are provided.
phrase1~4 .......Ideal for phrases containing cymbals or other instruments with a long decay. Four variations are provided.
quick ................Regardless of the phrase content, the sample is divided at the specified note sub-divisions. The number of slices per
measure is calculated by multiplying the top number of the Meter (time signature) parameter by the bottom number of
the SubDivide parameter.
n For helpful hints on getting the Slice Type parameter to work for different samples, see “Tips for using the Slice Types” on page
259.