


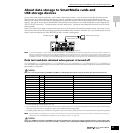


About data storage to SmartMedia cards and USB storage devices
28
Owner’s Manual
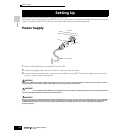
Setting Up
Using the SmartMedia™* cards
Be sure to handle SmartMedia cards with care. Follow the important precautions below.
* SmartMedia is a trademark of Toshiba Corporation.
■ Compatible SmartMedia card Type
3.3V (3V) SmartMedia cards can be used. 5V type
SmartMedia cards are not compatible with this instrument.
■ Memory Capacity
There are seven types of SmartMedia cards: 2MB/4MB/8MB/
16MB/32MB/64MB/128MB. Keep in mind that only
SmartMedia cards conforming to SSFDC standards (bearing
the SmartMedia logo) can be used.
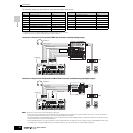
■ Inserting/Removing SmartMedia cards
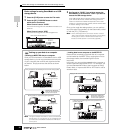
Inserting a SmartMedia card
With the gold-plated contact side facing down, insert the
SmartMedia card firmly but carefully into the card slot, as far
as it will go. Be careful not to insert the card upside down or
back side in. Also, do not insert anything else into the slot,
other than a proper SmartMedia card.
Removing a SmartMedia card
Before removing the SmartMedia card, be sure to confirm that
the SmartMedia card is not in use, or it is not being accessed
by the instrument. Then pull the SmartMedia card out slowly
by hand. If the SmartMedia card is being accessed*, a
message indicating that it is in use appears on the
instrument’s display.
* This includes all save, load, format, delete and create directory
operations for the SmartMedia card. Also, be aware that the
instrument will automatically access the SmartMedia card to check
the media type when it is inserted while the instrument is turned on.
Never attempt to remove the SmartMedia card or turn the power off during
accessing. Doing so can damage the data on the instrument/SmartMedia
card and possibly the SmartMedia card itself.
■ Formatting SmartMedia cards
Before using a SmartMedia card with your instrument it must
first be formatted (page 268). Once it is formatted all data on
it will be erased. Make sure that no important data is
contained on the card beforehand.
n The SmartMedia cards formatted with this instrument may be
unusable with other instruments or devices.
■ About the SmartMedia cards
Handle SmartMedia cards with care!
• SmartMedia cards are very sensitive and can be damaged
by static electricity. Before handling a SmartMedia card,
make sure to discharge any static electricity in your body by
touching something made of metal, such as a door knob or
aluminum blinds.
• Be sure to remove the SmartMedia card from the CARD slot
when it is not in use for a long time.
• Do not expose the SmartMedia card to direct sunlight,
extremely high or low temperatures, or excessive humidity,
dust or liquids.
• Do not place heavy objects on a SmartMedia card or bend
or apply pressure to the SmartMedia card in any way.
• Never touch the gold-plated contact with your fingers or let
it come in contact with any other metallic or hard surface.
• Do not expose the SmartMedia card to magnetic fields,
such as those produced by televisions, speakers, motors,
etc., since magnetic fields can partially or completely erase
data on the SmartMedia card, rendering it unreadable.
• Do not attach anything other than the provided labels to a
SmartMedia card. Also make sure that labels are attached
in the proper location.
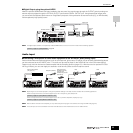
Protecting your data (write-protect)
To prevent important data from being inadvertently erased,
apply the write-protect seal (provided with the SmartMedia
card) to the circle spot indicated on the card. If you are
saving data to the card, make sure to remove the write-protect
seal. Do not reuse a seal that has been removed; it may not
stick properly to the card and could come off in the slot.
■ Data Backup
For maximum data security Yamaha recommends that you
keep two copies of important data on separate SmartMedia
cards. This gives you a backup if one SmartMedia card is lost
or damaged.
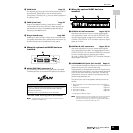
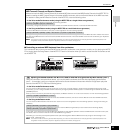
■ Burglarproof Lock
This instrument is equipped with a burglarproof lock for the
SmartMedia card. If necessity arises, install the burglarproof
lock onto the instrument.
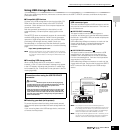
To install the burglarproof lock:
1 Remove the metallic part using a Phillips screwdriver.
2 Turn the metallic part upside down and replace it in the
new position.
CAUTION