


Appendix
Installing Optional Hardware
288
Owner’s Manual
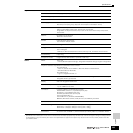
Installing the mLAN16E
1~4
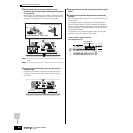
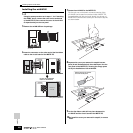
Using the same procedure as in steps 1 - 4 of “Installing
the AIEB2” above, remove the cover on the underside
of the MOTIF ES, then remove the cover of the mLAN-I/
O expansion bay on the rear panel.
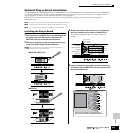
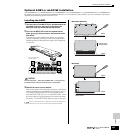
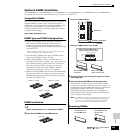
5 Remove the mLAN16E from its package.
6 Insert the connector on the other end of the flat ribbon
cable to the circuit board of the MOTIF ES.
7 Fasten the mLAN16E to the MOTIF ES.
Flip the unit over, so that each connector section of the
mLAN16E can be seen from the back side of MOTIF ES.
Supporting the unit with one hand, attach it to the rear of
the MOTIF ES with the two screws you removed in step #4,
as shown below.
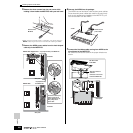
8 Separate the cover you removed in step #4 into two
parts (A and B shown below), then attach part A to the
rear panel of the MOTIF ES, covering the empty space
left by the installation of the mLAN16E.
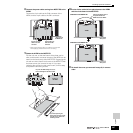
9 Let the flat ribbon cable fall into place between the
mLAN16E and the circuit board of the MOTIF ES.
10Re-install the cover you removed in step #3, in reverse
order.
mLAN16E
Underside of
mLAN16E
↓ Rear panel of the MOTIF ES
Flip over the mLAN16E and
fasten it to the MOTIF ES.
↓ Rear panel of the MOTIF ES
A
B
Remove the screw to separate
the cover into two parts.