


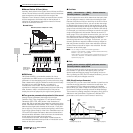
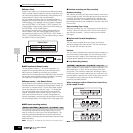
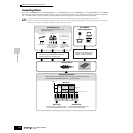
Basic Structure
Internal Structure (System Overview)
168
Owner’s Manual
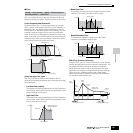
● Pattern Chain
Pattern Chain allows you to string several different Sections
(within a single Pattern) together to make a single Song. You
can have the synthesizer automatically change Sections by
creating Pattern Chains in this way beforehand.
You can create the Pattern Chain by recording a Pattern
playback with Section changes from the [PATTERN] → [F6]
CHAIN display or by editing the timing of Section changes
from the [PATTERN] → [F6] CHAIN → [EDIT] display. The
created Pattern Chain can be played back when calling up
the [PATTERN] → [F6] CHAIN display.
You can also use them when creating Songs based on a
certain Pattern, since the created Pattern Chain can be
converted into a Song from the [PATTERN] → [F6] CHAIN →
[EDIT] → [F3] SONG display. This synthesizer lets you create
one Pattern Chain for each Pattern.
■ MIDI tracks and Sample tracks
The Song/Pattern tracks (1 - 16) of this synthesizer are
divided into two groups: MIDI tracks and Sample tracks.
MIDI tracks are created by recording your keyboard
performance in the Song Record mode/Pattern Record mode.
On the other hand, Sample tracks are created by recording
and obtaining a Sample in the Sampling mode.
● Sample tracks — with Sample Voices
Voices which are automatically created and stored using the
Sampling feature in the sequencer (Song/Pattern) mode, are
referred to as “Sample Voices.” Tracks using these Sample
Voices are referred to as “Sample” tracks — to distinguish
them from the MIDI tracks. Sample Voices are stored as
original, dedicated Voices for each Song or Pattern. If you
wish to use a Sample Voice of a certain song/pattern for
another song/pattern, execute the copy operation in the Song
Job mode (page 226) or in the Pattern Job mode (page 244).
■ MIDI track recording method
The following explanations are important points for you to
keep in mind as you record your User Songs/Patterns. The
recording methods explained here should be set from the
Setup display in the Song Record mode/Pattern Record mode
before recording.
n See page 173 for details about the Sample track recording method.
● Realtime recording and Step recording
Realtime recording
With realtime recording, the instrument functions in the same
way as a tape recorder, recording the performance data as it
is played. This allows you to capture all the nuances of an
actual performance. This method is used for the Recording
types explained below, such as Replace, Overdub, Loop, and
Punch In/Out.
Step recording (Type = step)
With step recording, you can compose your performance by
“writing” it down one event at a time. This is a non-realtime,
step recording method — similar to writing music notation
onto paper.
● Replace and Overdub (Song/Pattern)
Replace
You can use this method when you want to overwrite an
already recorded track with new data. The first recording is
lost, and the new one takes its place.
Overdub
You can use this method when you want to add more data to a
track that already contains data. The first recording is kept,
and the new one is added. This method lets you build up a
complex phrase together with Loop recording (below).
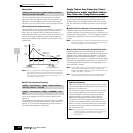
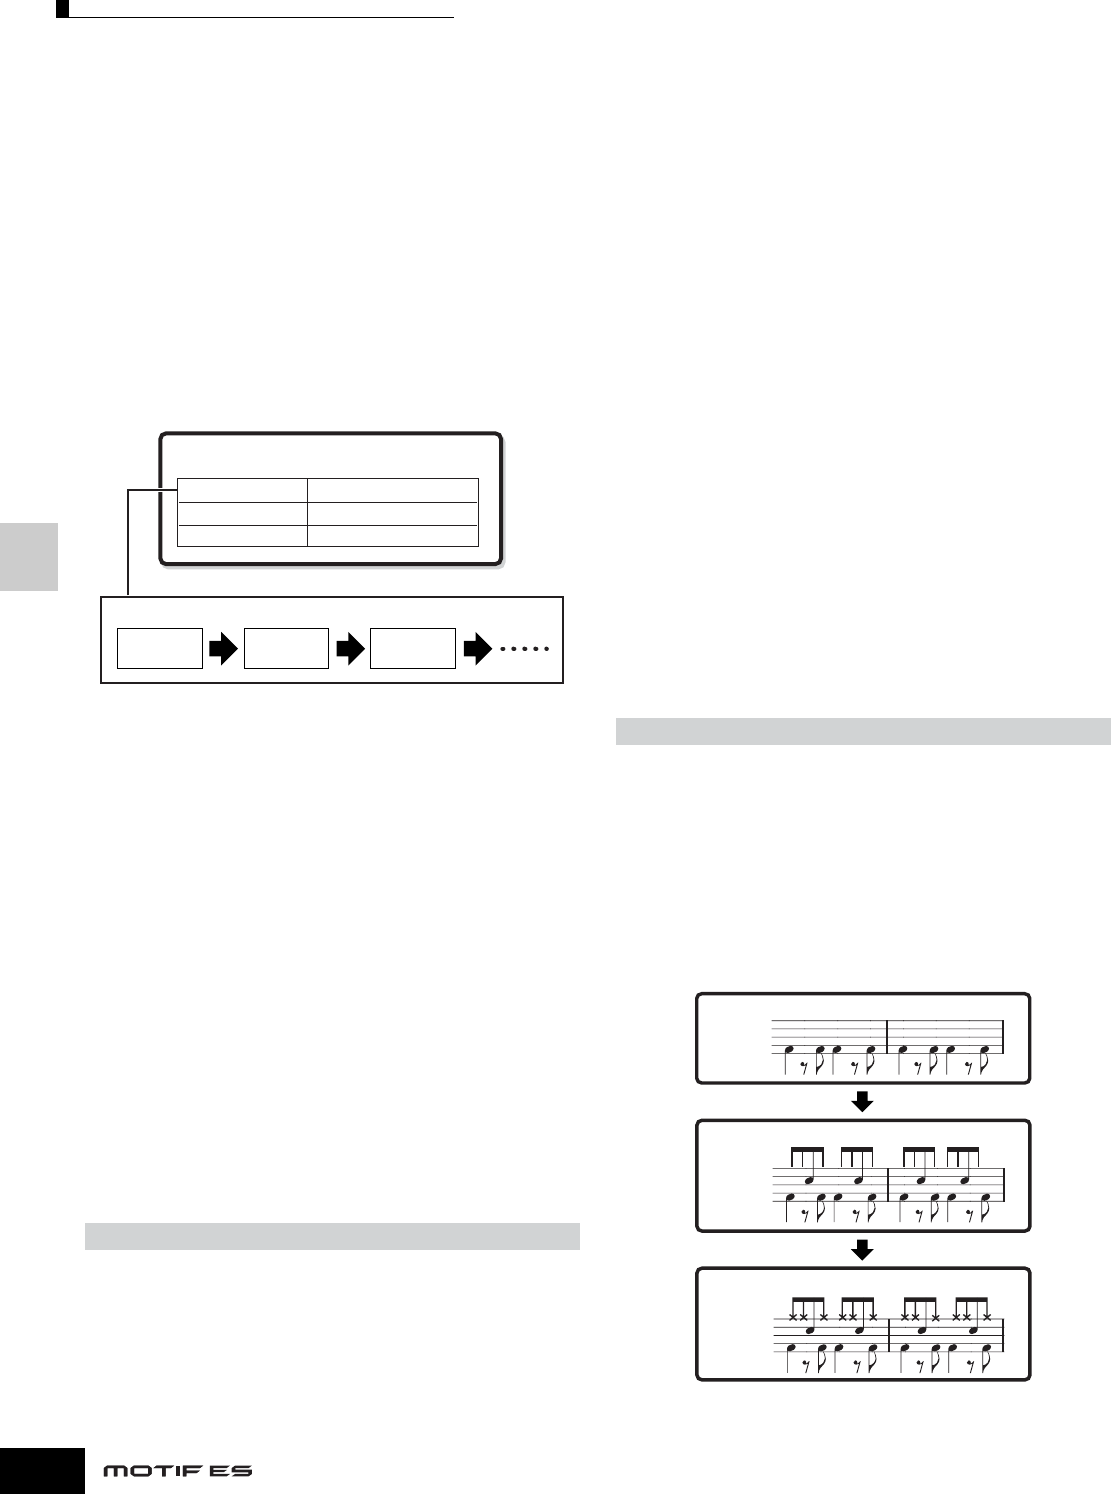
● Loop Recording (Pattern)
Pattern repeats the rhythm pattern of several measures (1 to
256 measures) in a “loop,” and its recording is also done
using loops. This method is used when recording a Pattern
Phrase using the Overdub method (above). As shown in the
example below, notes that you record will play back from the
next repetition (loop), letting you record while hearing
previously recorded material.
When recording a rhythm of Bass Drum, Snare Drum,
Hi-Hat cymbal in order:
n Loop Recording can only be used with Realtime recording.
[SONG] or [PATTERN] → [●] (Record) → [F1] SETUP → Type
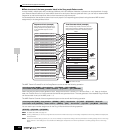
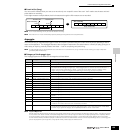
Pattern Chain
Example
Pattern track
Section J Section H Section P
Scene track
Tempo track
Section change
Track mute setting
Tempo change
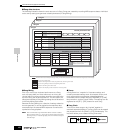
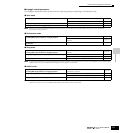
[PATTERN] → [●] (Record) → [F1] SETUP → loop = on
Loop 1st round
Loop 2nd round
Loop 3rd round
Bass Drum
Snare Drum
Bass Drum
Hi-Hat
Snare Drum
Bass Drum