


Reference
Master Mode
Master Play mode
271
Owner’s Manual
Master mode
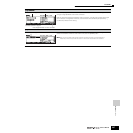
■ Creating Masters — basic procedure
The Master mode lets you play and edit special program combinations called “Masters.” A Master can contain up to four different Voices or
Performances, each assigned to a separate MIDI “Zone.” Alternately, it can contain specific Songs or Patterns. As such, it lets you set up the
instrument just as you need for live performance, switching through the Masters in order as you need them.
To create a Master, set the various parameters below in the Master Play and Master Edit modes. Use the Master Job mode to initialize data or
transfer it to another device.
Once you’ve edited a Master, you can store it to a User Bank in internal memory (Flash ROM) and save all the edited Masters to a SmartMedia/
USB storage device in the File mode.
The Master Play mode lets you perform a variety of general editing operations on the selected Master. For more detailed and comprehensive
editing operations, use the Master Edit mode. Edited parameters with the exception of some parameters are stored to internal Flash ROM as a
User Master.
The Master Edit is divided into Common Edit, for setting parameters common to all four Zones, and Zone Edit, for setting parameters of
individual Zones.
When Zone Switch is set to on in the [F2] MEMORY display in the Master Play mode, only the Common Edit is available.
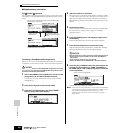
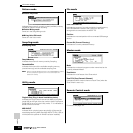
Master Play mode
[MASTER] → Master selection
[F1] PLAY
OCT (Octave) Indicates Keyboard Octave setting set via the [OCTAVE] buttons.
This can be changed also with the following operation: [UTILITY] → [F1] GENERAL → [SF2] KBD → Octave.
ASA (ASSIGN A),
ASB (ASSIGN B)
Indicates the functions assigned to the respective Knobs (printed “ASSIGN A” and “ASSIGN B”) when the lamps of
both the [PAN/SEND] and [TONE] buttons are turned on. The functions are assigned from the [UTILITY] → [F4] CTL
ASN → [SF2] ASSIGN display.
n OCT (Octave), ASA (ASSIGN A), and ASB (ASSIGN B) settings are not independently assignable for each Master. Because of this, these are not stored as an individual
Master in the Master Store mode (page 137).
AS1 (ASSIGN 1),
AS2 (ASSIGN 2)
Indicates the values obtained by controlling the respective Knobs (printed “ASSIGN 1” and “ASSIGN 2”) when the
lamps of both the [PAN/SEND] and [TONE] buttons are turned on. The functions assigned to these knobs depend on
the setting of the Voice selected as a Master program.
[SF1] ARP1 (Arpeggio 1) - [SF5]
ARP5 (Arpeggio 5)
You can call up the Arpeggio types by pressing these buttons to which the Arpeggio types are assigned.
The Arpeggio type assigned to each button depends on the program (Voice, Performance, Song, Pattern) selected
as a Master.
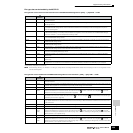
[F2] MEMORY
From this display you can set basic parameters for the Master, including the mode that is called up with the Master and the program number.
Mode Determines the mode that is called up when the Master number is selected.
Settings: Voice, Performance, Pattern, Song
Memory Determines the Program number that is called up when the Master is selected.
Settings:
When the Mode is set to Voice: Select a Voice bank and number. Refer to the instructions page 60.
When the Mode is set to Performance: Select a Performance bank and number. Refer to the instructions on page 67.
When the Mode is set to Pattern: Select a Pattern and section. Refer to the instructions on page 57.
When the Mode is set to Song: Select a Song number. Refer to the instructions on page 56.
ZoneSwitch Determines whether the Zone function is used (on) or not (off). See page 137 for details about the Zone function.
n When the Mode is set to “Voice” or “Performance” and the Zone Switch is turned on, only Zone 1 can be used in the default
setting (playing Zones 2-4 will produce no sound). You can use these Zones by setting various parameters in the Master Edit
mode.
Master Edit mode
[MASTER] → Master selection → [EDIT]