


Quick Guide — Advanced Course
Creating a Song on the MOTIF ES
121
Owner’s Manual
Song Recording using Plug-in Voices
This section shows you how to use the Voices of an optional Single Part Plug-in Board (such as PLG150-AN, PLG150-PF
and PLG150-DX) in recording a Song.
1 ~ 4
Install a Single Part Plug-in Board to the
instrument, then follow steps #1 - 4 on page 75 to
set the necessary parameters.
In step #4, set PORT.NO (port number) to “2” or “3.”
Keep in mind that if you’ve also installed a PLG100-
XG Multi-Part Plug-in Board, the boards should be
set to different numbers.
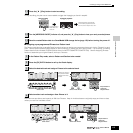
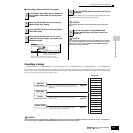
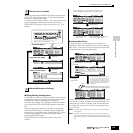
5 Enter the Song Play mode and call up the MIDI
output setting display ([SONG] →→
→→
[F3] TRACK →→
→→
[SF1] CHANNEL).
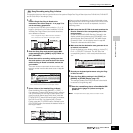
6 Select the track for recording, making sure that
the track number is the same as that of the slot to
which the Plug-in Board is installed, and set the
port number.
The track number must match the slot number, and
the port number must be the same as set in step #4
above.
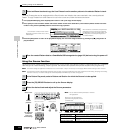
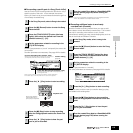
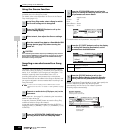
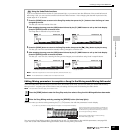
7 Select a Voice of the installed Plug-in Board.
Enter the Mixing Edit mode ([MIXING] → [EDIT] →
Part selection). Press the [F6] button once or twice to
call up the display for the Plug-in Board parts (PLG
parts) as shown below (page 164). Next, press the
[TRACK SELECT] button (the lamp lights), and select
the PLG Part of Slot 1 by pressing the [1] button.
Finally, press the [F1] VOICE button, followed by the
[SF1] VOICE button, then select the desired Voice on
the Plug-in Board.
When you play the keyboard, you should be able to hear
the selected Voice of the Plug-in Board. If the Voice of the
Plug-in Board does not sound as expected, check the
following points.
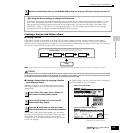
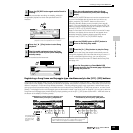
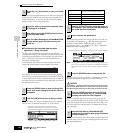
● Make sure that the OUT CH of the track matches the
Receive Channel of the corresponding Part of the
tone generator.
Check the ReceiveCh (MIDI Receive Channel) in the
display called up by pressing the [SF2] MODE in the
above display, then check the OUT CH (MIDI Output
Channel) of track 1 in the display shown in step #6.
These two channels should be same.
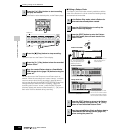
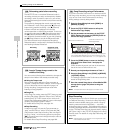
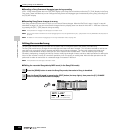
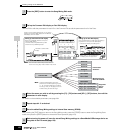
● Make sure that the destination tone generator is set
to internal, not external.
Check the settings in the display called up via the [F1]
PLAY → [SF2] OUT CH button. The INT SW of the
corresponding track (1 in this case) should be set to
“on.”
8 Record your keyboard performance using the Plug-
in Voice to track 1.
9 Store the Song Mixing settings in the [SONG] →→
→→
[MIXING] →→
→→
[STORE] display (page 131).
The settings related to the Plug-in Board voice should
be stored as Song Mixing data.
10 Save the created Song data to a SmartMedia/USB
storage device (page 131) before turning the
power off.
n The explanations above apply also to the Pattern modes.
TIP
When a Single Part Plug-in Board has been installed to
slot 1, move the cursor here then set the port number.
When a Single Part Plug-in Board has been installed to
slot 1, move the cursor here then set the port number.
Voice Bank
Voice Number