


Quick Guide — Advanced Course
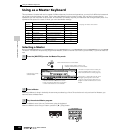
Using as a Master Keyboard
137
Owner’s Manual
Memorize to a Master
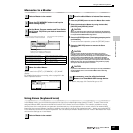
Input a name in the [EDIT] → [COMMON] → [F1] NAME
display.
For detailed instructions on naming, refer to page 53 in the
Basic Operation section.
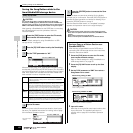
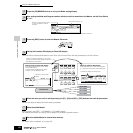
1
Press the [STORE] button to enter the Master Store mode.
2 Select the destination Master by using the data dial,
[INC/YES] and [DEC/NO] button.
When you execute the Store operation, the settings for the destination
memory will be overwritten. Important data should always be backed up
to a separate SmartMedia/USB storage device.
3 Press the [ENTER] button. (The display prompts you for
confirmation.)
To cancel the Store operation, press the [DEC/NO] button.
4 Press the [INC/YES] button to execute the Store
operation.
Keep in mind that the Store operation may take a short time to
complete, during which an “Executing..” or “Please keep power on”
message may be shown. Never attempt to turn off the power while data
is being written to Flash ROM while such a message is displayed.
Turning the power off in this state results in loss of all user data and
may cause the system to freeze (due to corruption of data in the Flash
ROM). This may also result in the MOTIF ES being unable to properly
start up the next time the power is turned on.
If you select another Master without storing, the currently edited Master
will be lost. Make sure to store the edited Master before selecting
another Master.
For details, see page 132. Set the file type to “All.”
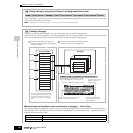
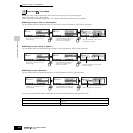
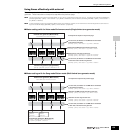
Using Zones (keyboard area)
In the Master mode, you can divide the keyboard into (up to) four independent areas (called “Zones”). To each Zone can be
assigned different MIDI channels and different functions of the Knobs and Control Sliders. This makes it possible to control
several parts of the multi-timbral tone generator simultaneously by a single keyboard or to control voices of an external MIDI
instrument over several different channels in addition to the internal voices of this synthesizer itself — letting you use the MOTIF
ES to effectively do the work of several keyboards. You can set the parameters related to the four Zones in the Master Edit mode
and store the settings as a User Master.
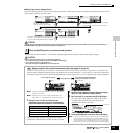
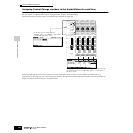
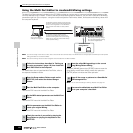
1
Select a Master to be created.
2
Press the [F2] MEMORY button to call up the
Mode setting display.
3
Set the Mode, Program number and Zone Switch
on/off (page 138) which you wish to memorize to
the Master.
When the Mode is set to Voice Select a Voice bank and number.
When the Mode is set to Performance Select a Performance bank and number.
When the Mode is set to Song Select a Song number.
When the Mode is set to Pattern Select a Pattern number.
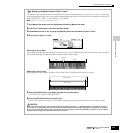
4
Name the edited Master.
Determine the mode that is called up
when the Master number is selected.
Set the Zone Switch (below) to
on or off.
Determine the Program number that is
called up when the Master is selected.
Input a Master name.
5
Store the edited Master to internal User memory.
6
As necessary, save the edited and stored
Masters to a SmartMedia/USB storage device.
CAUTION
CAUTION
CAUTION
1
Select a Master to be created.