


Creating a Song on the MOTIF ES
120
Owner’s Manual
Quick Guide — Advanced Course
Rehearsing parts before recording
The MOTIF ES has a convenient Rehearsal mode in
recording, that lets you easily and temporarily disable
recording in order to practice a part or try out various
ideas (while listening to the other tracks) without actually
recording.
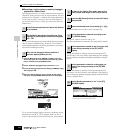
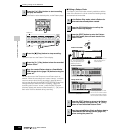
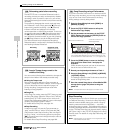
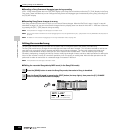
To temporarily disengage the record mode and enter
the “Rehearsal” mode, simply press the [●] (Record)
button during realtime recording – the [●] (Record)
indicator will flash and playback will continue
uninterrupted but no data will be recorded. To return to
the record mode press the [●] (Record) button again –
the [●] (Record) indicator will light continuously. You
can repeat this process as often as you wish, pressing
the [■] (Stop) button to cancel the Rehearsal mode.
The Record button lamp indicates the Recording/
Rehearsal status: continuously lit indicates Recording,
and flashing indicates Rehearsal.
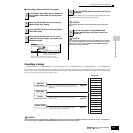
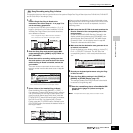
Insert a Tempo change event to the
middle of the Song
You can use the following three methods to change the
tempo in the middle of the already-recorded song.
● Using the Tempo track
Start recording after setting the Type parameter to
“replace,” setting RecTrack to “tempo,” and moving the
cursor to the tempo value in step #4 on page 118.
During recording, change the tempo value while
listening to Song playback.
● Song Edit
In the Song Play mode, press the [EDIT] button to enter
the Song Edit mode. Select the Tempo track (TMP) by
pressing the [F4] TR SEL button once or twice, then
change the existing tempo value or insert a new tempo
value by using the [F5] INSERT button.
For details about Song Edit, see page 124.
● Step Recording
In step #4 on page 118, set the Type parameter to
“step” and RecTrack to “tempo” then press the [F]
(Play) button to start Step recording. After moving the
cursor to “Value,” move the song pointer by using the
[H] (Forward) button and change the tempo value at
the desired point.
For details about Step Recording, see page 238.
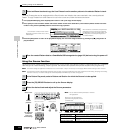
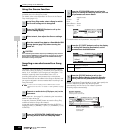
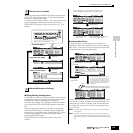
Song Recording using a Performance
If you have a favorite Performance or one that would fit
the Song to be recorded, you can copy certain settings
of up to four Parts of the Performance to the Song
Mixing settings currently being edited.
1 Enter the Song Mixing Job mode ([SONG] →→
→→
[MIXING] →→
→→
[JOB]).
2 Press the [F5] PF COPY button to call up the
Performance Copy display.
3 Set the parameters as necessary in the [F5] PF
COPY display, then press the [ENTER] button to
execute the Copy operation.
4 Press the [SONG] button to return to the Song
Play mode, then select Track 1 and play the
keyboard.
Check whether the sound you hear is the same as
that of the source Performance or not.
5 Record your keyboard performance to Track 1.
6 Store the Song Mixing in the [SONG] →→
→→
[MIXING]
→→
→→
[STORE] display.
The settings copied from the Performance should be
stored as Song Mixing data.
7 Save the created Song data to a SmartMedia/USB
storage device (page 132) before turning the
power off.
n The explanations above also apply to the Pattern mode.
Step Recording
The explanations in this Quick Guide have concentrated
on Realtime Recording. However, the Step Recording
method is also available, letting you record a Song by
entering notes and events individually — much like
writing them down on paper. This is especially useful for
recording passages that would be difficult or impossible
to play. The Step Recording can be executed by setting
the Type to “step” in the [F1] SETUP display in the Song
Record mode. For details on using Step Recording, see
page 238.
n Step Recording can be used both in the Song Record mode
and the Pattern Record mode.
TIP
SEQ TRANSPORT
LOCATE 1 2
SEQ TRANSPORT
LOCATE 1 2
Recording Rehearsal mode
(playback continues)
TIP
TIP
The destination Mixing Parts appear automatically. The displayed
Part numbers differ depending on the source Performance. If the
source Performance contains four Parts, “1, 2, 3, 4” appears here.
Select a source Performance.
Checkmark the boxes of the
desired parameters.