


Reference Pattern Mode
Pattern Play mode
241
Owner’s Manual
Pattern mode
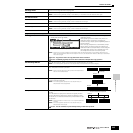
■ Creating Patterns — basic procedure
Patterns consist of the following three types of data:
• MIDI sequence data (created in the Pattern Record mode, Pattern Edit mode, and Pattern Job mode)
• Setup data (created in the Pattern Play mode)
• Mixing data (created in the Pattern Mixing mode/Mixing Edit mode and stored in the Pattern Mixing Store mode)
After creating the data in these modes described above, store the Mixing settings in the Pattern Mixing Store mode to archive it as Pattern data
and save the entire Pattern to the SmartMedia/USB storage device in the File mode.
n Non-note MIDI events (such as Voice number, volume, pan, and effect send level) which are necessary at the start of a Pattern are not recorded as MIDI
sequence data, but are stored instead as Mixing data.
Because Pattern data (MIDI sequence data, Setup data, and Mixing data) is recorded to DRAM (page 187), it will be lost when turning the power off. Make
sure to save any Pattern data created via the Record, Edit, Job, and Mixing setting to the SmartMedia/USB storage device in the File mode before turning
the power off. For details on saving Pattern data, see page 132.
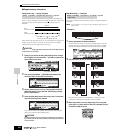
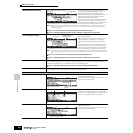
Pattern Play mode
[PATTERN] → Pattern selection
[F1] PLAY
Refer to page 56 in the Quick Guide section.
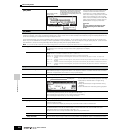
Trans (Transpose) Determines the key transpose setting for the Pattern, and can be adjusted in semitones.
Settings: -36 ~ +36
n If Transpose is applied to a Drum Voice, the results may not be musically appropriate. To ensure proper playback of a Drum
Voice, set the Note Shift parameter for the Drum Voice Part to an appropriate value ([PATTERN] → [MIXING] → [EDIT] → Part
selection → [F4] TONE → [SF1] TUNE → NoteShift).
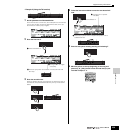
MEAS (Measure) Indicates the current measure number and beat for the current Pattern. During playback, this indication changes
automatically according to the Pattern playback. You can input the desired measure number directly by using the
Number Input window called up via the [INFORMATION] button.
[SF1] ARP1 (Arpeggio 1) - [SF5]
ARP5 (Arpeggio 5)
You can register the desired Arpeggio types to these buttons and call them up any time during your keyboard
performance.
[F2] GROOVE (Grid Groove)
Same as in the Song Play mode. See page 221.
[F3] TRACK
[SF1] CHANNEL
Same as in the Song Play mode. See page 221.
[SF2] OUT SW (Output Switch)
Same as in the Song Play mode. See page 222.
[SF3] TR VCE (Track Voice)
Determines whether the program change data contained in the phrase data is effective or not. For most purposes,
this should be set to “off.” For example, if a phrase has embedded Voice changes (program change messages) but
you don’t want the Voice to change in the middle of the phrase, set this to “off.” Tracks that are set to “off” here
automatically play back with the Voice number assigned to the Part set in the Mixing mode.
n The Phrase Voice embedded in the Phrase can be specified from the Voice display in the Pattern Record mode (page 243).
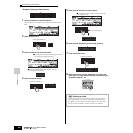
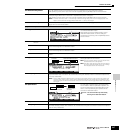
[F4] PATCH
Refer to page 113 in the Quick Guide section.
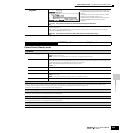
From this display, you can assign a Preset phrase or a User phrase (recorded in the Pattern Record mode) to each track and create a Pattern that contains up to
16 tracks.
n The Patch function allows you to use only User phrases recorded to a track of the currently selected Pattern. If you wish to use User phrases recorded to tracks of other Patterns,
use the Phrase Data Copy function, selected with [SF5] button.
Section Shows the current edited section. For details about how to change sections, see page 57.
Meas Shows Measure : Beat for current playback location.
[SF4] CLEAR
This clears the Phrase assignment to the currently selected track and leaves the track empty.
CAUTION