


Installing Optional Hardware
283
Owner’s Manual
Appendix
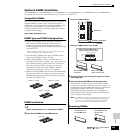
Optional Plug-in Board Installation
A variety of optional Plug-in boards sold separately let you expand the voice library of your instrument. For details about the
Plug-in Board line up which can be used with the MOTIF ES, see page 74.
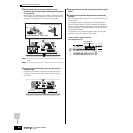
The MOTIF ES provides three slots on the rear panel for Plug-in Boards, allowing you to install up to three boards for
simultaneous use.
n The Vocal Harmony Plug-in board (PLG100-VH) can be installed only to slot 1.
n The Multi part Plug-in board (PLG-100XG) can be installed only to slot 3.
n The Single part Plug-in board can be installed to any of three slots.
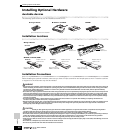
Installing the Plug-in Board
1 Turn the power of the MOTIF ES off, and disconnect the
AC power cord. Also, make sure to disconnect the
MOTIF ES from any connected external devices.
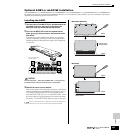
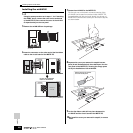
2 Remove the large screw from the expansion bay cover
on the rear panel using a Phillips screwdriver.
Keep the removed screw in a safe place. It will be used when re-
attaching the cover to the instrument.
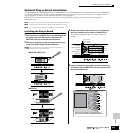
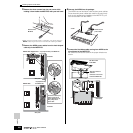
3 Remove the ribbon cables that are to be connected to
the Plug-in board from the inside of the MOTIF ES.
The slots are assigned to the color-coded cables as
follows:
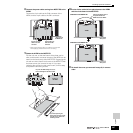
4 Insert the board along the guide rails about two-thirds
of the way inside the MOTIF ES, with the connector side
face up and toward you.
GREEN
YELLOW
ORANGE
3
2
1
Plug-in SLOT
OUTPUT
ASSIGNABLE
OUTPUT
L MONO
PHONES
A
DINPUT
GAIN
L
RR
R
L
GREEN
YELLOW
ORANGE
3
2
1
Plug-in SLOT
OUTPUT
ASSIGNABLE
OUTPUT
L MONO
PHONES
A
DINPUT
GAIN
L
RR
R
L
MOTIF ES6 / MOTIF ES7
GREEN
YELLOW
ORANGE
Plug-in SLOT
GREEN
YELLOW
ORANGE
Plug-in SLOT
MOTIF ES8
OUTPUT
ASSIGNABLE
OUTPUT
L MONO
PHONES
A
D
INPUT
GAIN
RL
R
R
L
GREEN
YELLOW
ORANGE
3
2
1
Plug-in SLOT
Slot 3
Slot 2
Slot 1
Cable for Slot 3
(Green)
Slot 1 –Orange
Slot 2 –Yellow
Slot 3 –Green
Cable for Slot 2
(Yellow)
Cable for Slot 1
(Orange)
OUTPUT
ASSIGNABLE
OUTPUT
L MONO
PHONES
A
D INPUT
GAIN
RL
R
R
L
GREEN
YELLOW
ORANGE
3
2
1
Plug-in SLOT
Slot 3
Slot 2
Slot 1
Securely insert the board into the appropriate slot,
taking care that the board isn’t jammed between slots.