


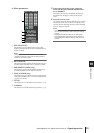


PM5D/PM5D-RH V2 / DSP5D Owner’s Manual Operating section 101
11
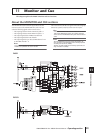
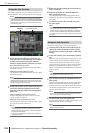
Monitor and Cue
Here we explain how you can use the MONITOR section
to monitor the desired source.
1
Make sure that your monitor system is con-
nected to the rear panel MONITOR OUT jacks
L/R/C.
If you want to monitor through headphones, make
sure they are connected to the top panel or front panel
PHONES jack.
Note
• Since the DSP5D does not have monitor functionality, the
PM5D’s MONITOR section will always operate the monitor
settings of machine #1 (PM5D).
• MONITOR OUT jack C is a special jack used to monitor the
center channel when LCR mode is active. Note that the
appropriate signal will not be output from MONITOR OUT
jack C unless the LCR channel is selected as the monitor
source and the USE AS CENTER BUS button is turned on
in the MIXER SETUP screen (SYS/W.CLOCK function)
(
➥
p.222).
• Turning on the [CUE] key of even one input channel, output
channel, or DCA group will override the settings of the MON-
ITOR section and cause the Cue signal to be output from
the MONITOR OUT jacks. Make sure that the CUE section
[INPUT]/[DCA]/[OUTPUT] LEDs are not lit.
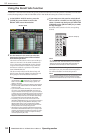
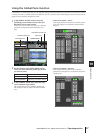
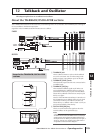
2
To specify the channel that will be selected by
the [DEFINE] key, press the DISPLAY ACCESS
section [MON/CUE] key repeatedly to access
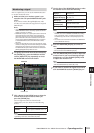
the MONITOR screen shown below.
3
Click a button in the DEFINE area to select the
channel that will be monitored when you
press the [DEFINE] key.
You can assign more than one channel to the
[DEFINE] key. You can choose from the following
sources.
Hint
The MONITOR screen also lets you make settings for monitor
signal delay, insert-out/in, and dimmer (
➥
p.238).
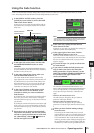
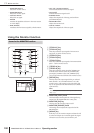
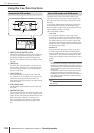
4
Use the keys of the MONITOR section to select
the monitor source from the following.
Hint
• You can simultaneously select one from 2TR A1–2TR D3 or
DEFINE, and one from STEREO A/STEREO B (including
LCR) (a maximum of two). To select this from the panel,
simultaneously press the two corresponding keys on the
panel.
• The monitor source can also be selected in the MONITOR
screen (MON/CUE function).
5
Press the MONITOR [ON] key to turn it on.
Hint
A signal is always output from the PHONES jacks regardless
of the on/off state of the MONITOR [ON] key.
6
Turn the MONITOR [LEVEL] knob to adjust the
monitor level. If you are monitoring through
headphones, turn the PHONES [LEVEL] knob
to adjust the monitor level.
Hint
Monitor level and monitor on/off status can also be operated
from the STEREO/DCA strip section (
➥
p.149).
7
If you want to monitor the signal in monaural,
turn the MONITOR section’s [MONO] key on.
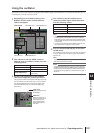
MIX 1–MIX 24 Output signals of MIX channels 1–24
MATRIX 1–
MATRIX 8
Output signals of MATRIX buses 1–8
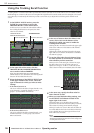
Monitoring a signal
MONITOR
DEFINE area
[2TR IN A1]/[2TR IN
A2] keys
The input signal from 2TR IN ANA-
LOG jacks 1/2
[2TR IN D1]/[2TR IN
D2]/[2TR IN D3] keys
The input signal from 2TR IN DIGI-
TAL jacks 1–3
[STEREO A]/[STE-
REO B] keys
The output signal of the STEREO A/
B channels
[STEREO A] key +
[STEREO B] key
The LCR channel output
[DEFINE] key
The signal pre-selected in the MON-
ITOR screen (MON/CUE function)