


16 Remote control
128 PM5D/PM5D-RH V2 / DSP5D Owner’s Manual Operating section
3
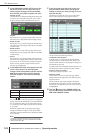
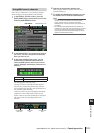
In the DISPLAY ACCESS section, press the
[MIDI/REMOTE] key several times to access the
MIDI REMOTE screen shown below.
4
In the BANK SELECT area at the upper right of
the screen, use the A–D buttons to select the
bank you want to use.
The bank name is displayed above buttons A–D. You
can change the name by clicking the button at the
left of the bank name.
5
In the upper left of the screen, set the TRANS-
MIT ENABLED/DISABLED button to ENABLED.
Transmission will be enabled for the selected bank.
(You can enable/disable transmission for each of the
four banks.)
6
Use the channel select area at the left of the
screen to select the MIDI remote channel to
which you want to assign a MIDI message.
These buttons correspond to the following channel
strips.
When you click the / buttons at the left and right
of the box, the corresponding name is displayed in the
box at the right. You can change the name of the MIDI
remote channel by clicking the button of the box at
right.
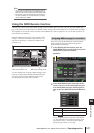
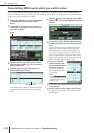
7
Use the MIDI message boxes in the lower part
of the screen to specify a MIDI message for
each controller of the channel.
The lower part of the MIDI REMOTE screen contains
MIDI message boxes that let you assign a MIDI mes-
sage to the ENCODER [ON] key, encoder, CH [ON]
key, and fader.
You can assign a MIDI message to a controller in any
of the following three ways.
A Directly inputting hexadecimal values
In this method you directly input the message as hexa-
decimal values. To use this method, click the button
at the left edge of the desired MIDI message box to
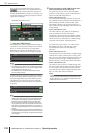
open the MIDI REMOTE SETUP window.
In this window you can input a message by clicking the
desired input box to select it (the box will be high-
lighted) and turning the [DATA] encoder. You can use
the [INC]/[DEC] keys to move the selected position.
You can input the following values.
REMOTE CH 1–24 INPUT channel strip 1–24
REMOTE CH 25–28 ST IN channel strip 1–4
MIDI REMOTE
BANK SELECT area
Channel select area
TRANSMIT
ENABLED/DISABLED button
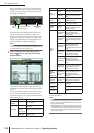
Value
Available
assign-
ments
Content
00(H)–
FF(H)
All
The MIDI message that is transmitted
(hexadecimal).
END All
Indicates the end of the MIDI mes-
sage. When you operate the corre-
sponding controller, the MIDI
message from the beginning until
immediately before END will be
transmitted.
SW All
Indicates the on/off status of the
encoder [ON] key or the channel
[ON] key. A value of 7F(H) is transmit-
ted when the key turns on, and a
value of 00(H) is transmitted when
the key turns off. If this is assigned to
an encoder or fader, the current value
of the key will be transmitted when
the encoder or fader is operated.
ENC
ENCODER
ON/
ENCODER
Indicates the current position of the
encoder. If assigned to an encoder, a
value of 00–7F(H) is transmitted
when the encoder is operated. If
assigned to an encoder [ON] key, the
current value of the encoder is trans-
mitted when the key is switched on.
FAD
CH ON/
FADER
Indicates the current position of the
fader. If the message is assigned to a
fader, this value is transmitted as a
value of 00–7F(H) when the fader is
operated. If assigned to a CH [ON]
key, the current value of the fader is
transmitted when the key is switched
on.
LEARN buttonLATCH button MIDI message box